江门小程序制作windows优化大师免费版
最近在学习React,发现其中的生命周期跟Vue有一些共同点,但也有比较明显的区别,并且执行顺序也值得讨论一下,于是总结了一些资料在这里,作为学习记录。
v17.0.1后生命周期图片
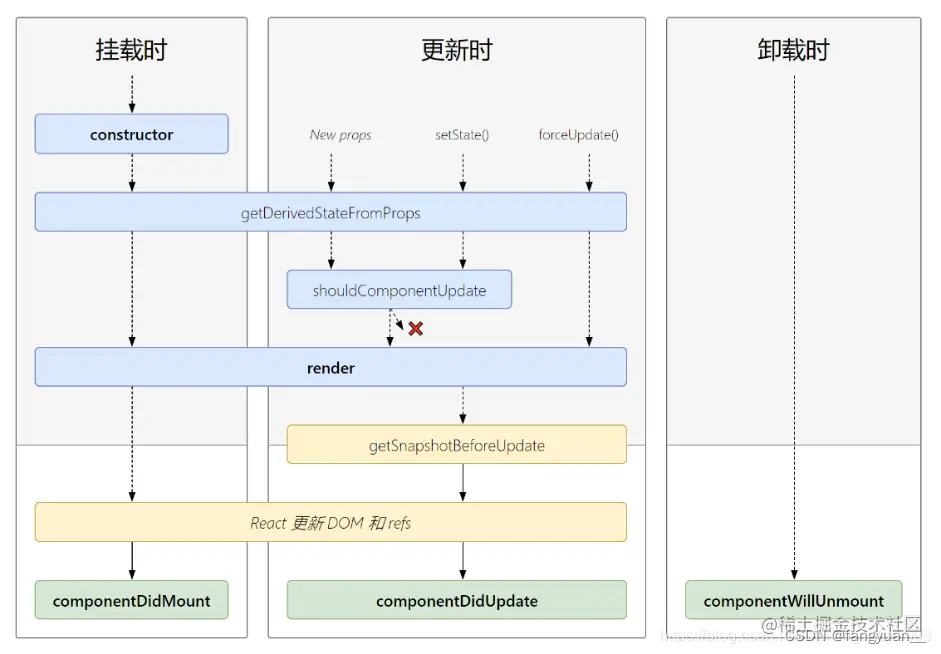
初始化阶段
由ReactDOM.render()触发 —— 初次渲染
- constructor() —— 类组件中的构造函数
- static getDerivedStateFromProps(props, state) 从props得到一个派生的状态【新增】
- render() —— 挂载组件
- componentDidMount() —— 组件挂载完成 比较常用
总结:
constructor 对标 Vue中的beforeCreate/created
componentDidMount 对标 Vue中的 Mounted
在一个完整的生命周期中,constructor 与 componentDidMount 只会执行一次。
在一个完整的生命周期中,render会执行多次
注意:
在React中,我们在componentDidMount 中发请求,绝对不在constructor 中发请求。
更新阶段
由组件内部this.setSate()或父组件重新render触发或强制更新forceUpdate()
- getDerivedStateFromProps() —— 从props得到一个派生的状态 【新增】
- shouldComponentUpdate() —— 组件是否应该被更新(默认返回true)
- render() —— 挂载组件
- getSnapshotBeforeUpdate() —— 在更新之前获取快照【新增】
- componentDidUpdate(prevProps, prevState, snapshotValue) —— 组件完成更新。
总结:
触发组件更新的方式(常用),两种:- 💥props 值的改变
- 💥setState() 改变state
更新阶段触发的钩子函数,有两个- render
- componentDidUpdate
render与componentsDidUpdate 都可以拿到更新后的值。
render与componentsDidUpdate 中都不能调用setState ,会造成死循环。
注意:
不论DOM中有没有使用数据,钩子函数都会被触发。(与vue不同)
react中的更新,指的是数据更新,而非视图更新。(与vue不同)
卸载组件
由ReactDOM.unmountComponentAtNode()触发
- componentWillUnmount() —— 组件即将卸载
重要的勾子
- render:初始化渲染或更新渲染调用
- componentDidMount:开启监听, 发送ajax请求
- componentWillUnmount:做一些收尾工作, 如: 清理定时器
即将废弃的勾子
- componentWillMount
- componentWillReceiveProps
- componentWillUpdate
现在使用会出现警告,下一个大版本需要加上UNSAFE_前缀才能使用,以后可能会被彻底废弃,不建议使用。
代码案例
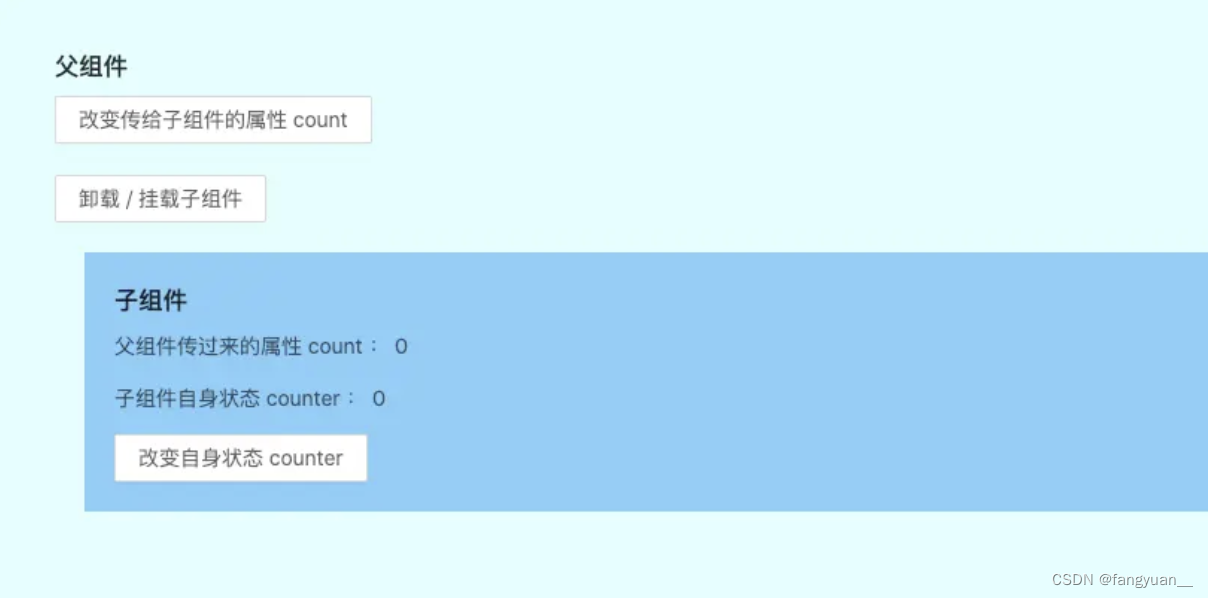
效果
代码展示
父组件:Parent.js
import React, { Component } from 'react';
import { Button } from 'antd';
import Child from './child';const parentStyle = {padding: 40,margin: 20,backgroundColor: 'LightCyan',
};const NAME = 'Parent 组件:';export default class Parent extends Component {constructor() {super();console.log(NAME, 'constructor');this.state = {count: 0,mountChild: true,};}static getDerivedStateFromProps(nextProps, prevState) {console.log(NAME, 'getDerivedStateFromProps');return null;}componentDidMount() {console.log(NAME, 'componentDidMount');}shouldComponentUpdate(nextProps, nextState) {console.log(NAME, 'shouldComponentUpdate');return true;}getSnapshotBeforeUpdate(prevProps, prevState) {console.log(NAME, 'getSnapshotBeforeUpdate');return null;}componentDidUpdate(prevProps, prevState, snapshot) {console.log(NAME, 'componentDidUpdate');}componentWillUnmount() {console.log(NAME, 'componentWillUnmount');}/*** 修改传给子组件属性 count 的方法*/changeNum = () => {let { count } = this.state;this.setState({count: ++count,});};/*** 切换子组件挂载和卸载的方法*/toggleMountChild = () => {const { mountChild } = this.state;this.setState({mountChild: !mountChild,});};render() {console.log(NAME, 'render');const { count, mountChild } = this.state;return (<div style={parentStyle}><div><h3>父组件</h3><Button onClick={this.changeNum}>改变传给子组件的属性 count</Button><br /><br /><Button onClick={this.toggleMountChild}>卸载 / 挂载子组件</Button></div>{mountChild ? <Child count={count} /> : null}</div>);}
}
子组件: Child.js
import React, { Component } from 'react';
import { Button } from 'antd';const childStyle = {padding: 20,margin: 20,backgroundColor: 'LightSkyBlue',
};const NAME = 'Child 组件:';export default class Child extends Component {constructor() {super();console.log(NAME, 'constructor');this.state = {counter: 0,};}static getDerivedStateFromProps(nextProps, prevState) {console.log(NAME, 'getDerivedStateFromProps');return null;}componentDidMount() {console.log(NAME, 'componentDidMount');}shouldComponentUpdate(nextProps, nextState) {console.log(NAME, 'shouldComponentUpdate');return true;}getSnapshotBeforeUpdate(prevProps, prevState) {console.log(NAME, 'getSnapshotBeforeUpdate');return null;}componentDidUpdate(prevProps, prevState, snapshot) {console.log(NAME, 'componentDidUpdate');}componentWillUnmount() {console.log(NAME, 'componentWillUnmount');}changeCounter = () => {let { counter } = this.state;this.setState({counter: ++counter,});};render() {console.log(NAME, 'render');const { count } = this.props;const { counter } = this.state;return (<div style={childStyle}><h3>子组件</h3><p>父组件传过来的属性 count : {count}</p><p>子组件自身状态 counter : {counter}</p><Button onClick={this.changeCounter}>改变自身状态 counter</Button></div>);}
}
从五种组件状态改变的时机来探究生命周期的执行顺序
一、父子组件初始化
父子组件第一次进行渲染加载时:
控制台的打印顺序为:
- Parent 组件: constructor()
- Parent 组件: getDerivedStateFromProps()
- Parent 组件: render()
- Child 组件: constructor()
- Child 组件: getDerivedStateFromProps()
- Child 组件: render()
- Child 组件: componentDidMount()
- Parent 组件: componentDidMount()
二、子组件修改自身状态 state
点击子组件 [改变自身状态counter] 按钮,其 [自身状态counter] 值会 +1, 此时控制台的打印顺序为:
- Child 组件: getDerivedStateFromProps()
- Child 组件: shouldComponentUpdate()
- Child 组件: render()
- Child 组件: getSnapshotBeforeUpdate()
- Child 组件: componentDidUpdate()
三、修改父组件中传入子组件的 props
点击父组件中的 [改变传给子组件的属性 count] 按钮,则界面上 [父组件传过来的属性 count] 的值会 + 1,控制台的打印顺序为:
- Parent 组件: getDerivedStateFromProps()
- Parent 组件: shouldComponentUpdate()
- Parent 组件: render()
- Child 组件: getDerivedStateFromProps()
- Child 组件: shouldComponentUpdate()
- Child 组件: render()
- Child 组件: getSnapshotBeforeUpdate()
- Parent 组件: getSnapshotBeforeUpdate()
- Child 组件: componentDidUpdate()
- Parent 组件: componentDidUpdate()
四、卸载子组件
点击父组件中的 [卸载 / 挂载子组件] 按钮,则界面上子组件会消失,控制台的打印顺序为:
- Parent 组件: getDerivedStateFromProps()
- Parent 组件: shouldComponentUpdate()
- Parent 组件: render()
- Parent 组件: getSnapshotBeforeUpdate()
- Child 组件: componentWillUnmount()
- Parent 组件: componentDidUpdate()
五、重新挂载子组件
再次点击父组件中的 [卸载 / 挂载子组件] 按钮,则界面上子组件会重新渲染出来,控制台的打印顺序为:
- Parent 组件: getDerivedStateFromProps()
- Parent 组件: shouldComponentUpdate()
- Parent 组件: render()
- Child 组件: constructor()
- Child 组件: getDerivedStateFromProps()
- Child 组件: render()
- Parent 组件: getSnapshotBeforeUpdate()
- Child 组件: componentDidMount()
- Parent 组件: componentDidUpdate()
父子组件生命周期执行顺序总结:
- 当子组件自身状态改变时,不会对父组件产生副作用的情况下,父组件不会进行更新,即不会触发父组件的生命周期
- 当父组件中状态发生变化(包括子组件的挂载以及卸载)时,会触发自身对应的生命周期以及子组件的更新
- render 以及 render 之前的生命周期,则 父组件先执行
- render之后的生命周期,子组件先执行,并且与父组件交替执行
- 当子组件进行卸载时,只会执行自身的 componentWillUnmount 生命周期,不会再触发别的生命周期