做网站的步骤的文本全国免费发布广告信息
十五、面向切面编程AOP
IoC使软件组件松耦合。AOP让你能够捕捉系统中经常使用的功能,把它转化成组件。
AOP(Aspect Oriented Programming):面向切面编程,面向方面编程。(AOP是一种编程技术)
AOP是对OOP的补充延伸。
AOP底层使用的就是动态代理来实现的。
Spring的AOP使用的动态代理是:JDK动态代理 + CGLIB动态代理技术。Spring在这两种动态代理中灵活切换,如果是代理接口,会默认使用JDK动态代理,如果要代理某个类,这个类没有实现接口,就会切换使用CGLIB。当然,你也可以强制通过一些配置让Spring只使用CGLIB。
15.1 AOP介绍
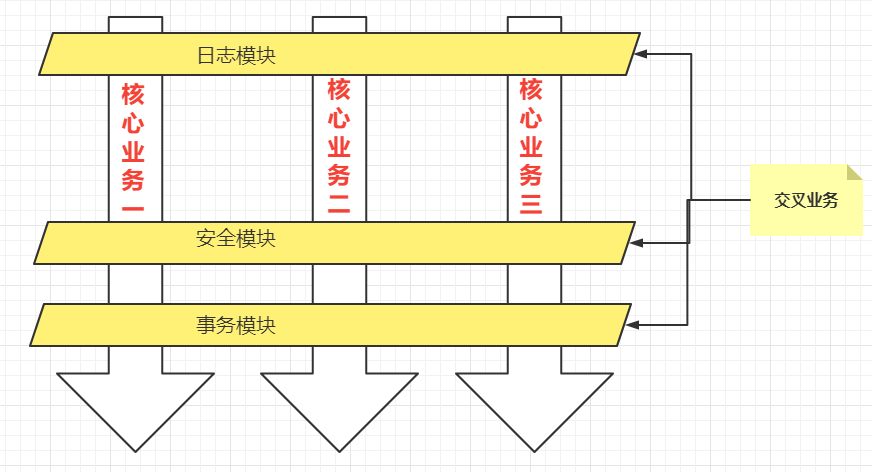
一般一个系统当中都会有一些系统服务,例如:日志、事务管理、安全等。这些系统服务被称为:交叉业务
这些交叉业务几乎是通用的,不管你是做银行账户转账,还是删除用户数据。日志、事务管理、安全,这些都是需要做的。
如果在每一个业务处理过程当中,都掺杂这些交叉业务代码进去的话,存在两方面问题:
- 第一:交叉业务代码在多个业务流程中反复出现,显然这个交叉业务代码没有得到复用。并且修改这些交叉业务代码的话,需要修改多处。
- 第二:程序员无法专注核心业务代码的编写,在编写核心业务代码的同时还需要处理这些交叉业务。
使用AOP可以很轻松的解决以上问题。
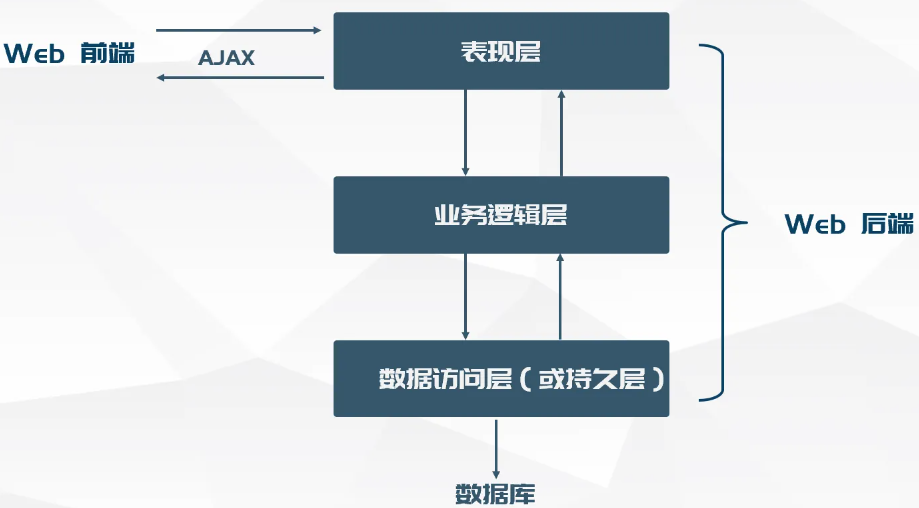
请看下图,可以帮助你快速理解AOP的思想:
总结
用一句话总结AOP:将与核心业务无关的代码独立的抽取出来,形成一个独立的组件,然后以横向交叉的方式应用到业务流程当中的过程被称为AOP。
AOP的优点:
- 第一:代码复用性增强。
- 第二:代码易维护。
- 第三:使开发者更关注业务逻辑。
15.2 AOP的七大术语
public class UserService{public void do1(){System.out.println("do 1");}public void do2(){System.out.println("do 2");}public void do3(){System.out.println("do 3");}public void do4(){System.out.println("do 4");}public void do5(){System.out.println("do 5");}// 核心业务方法public void service(){do1();do2();do3();do5();}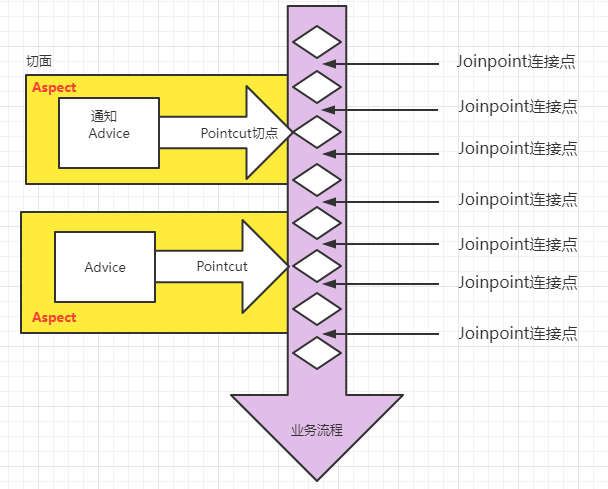
}- 连接点 Joinpoint
-
- 在程序的整个执行流程中,可以织入切面的位置。方法的执行前后,异常抛出之后等位置。
- 切点 Pointcut
-
- 在程序执行流程中,真正织入切面的方法。(一个切点对应多个连接点)
- 通知 Advice
-
- 通知又叫增强,就是具体你要织入的代码。
- 通知包括:
-
-
- 前置通知
- 后置通知
- 环绕通知
- 异常通知
- 最终通知
-
- 切面 Aspect
-
- 切点 + 通知就是切面。
- 织入 Weaving
-
- 把通知应用到目标对象上的过程。
- 代理对象 Proxy
-
- 一个目标对象被织入通知后产生的新对象。
- 目标对象 Target
-
- 被织入通知的对象。
通过下图,大家可以很好的理解AOP的相关术语:
15.3 切点表达式
切点表达式用来定义通知(Advice)往哪些方法上切入。
切入点表达式语法格式:
execution([访问控制权限修饰符] 返回值类型 [全限定类名]方法名(形式参数列表) [异常])访问控制权限修饰符:
- 可选项。
- 没写,就是4个权限都包括。
- 写public就表示只包括公开的方法。
返回值类型:
- 必填项。
- * 表示返回值类型任意。
全限定类名:
- 可选项。
- 两个点“..”代表当前包以及子包下的所有类。
- 省略时表示所有的类。
方法名:
- 必填项。
- *表示所有方法。
- set*表示所有的set方法。
形式参数列表:
- 必填项
- () 表示没有参数的方法
- (..) 参数类型和个数随意的方法
- (*) 只有一个参数的方法
- (*, String) 第一个参数类型随意,第二个参数是String的。
异常:
- 可选项。
- 省略时表示任意异常类型。
理解以下的切点表达式:
- service包下所有的类中以delete开始的所有方法
execution(public * com.powernode.mall.service.*.delete*(..))- mall包下所有的类的所有的方法
execution(* com.powernode.mall..*(..))- 所有类的所有方法
execution(* *(..))15.4 使用Spring的AOP
Spring对AOP的实现包括以下3种方式:
- 第一种方式:Spring框架结合AspectJ框架实现的AOP,基于注解方式。
- 第二种方式:Spring框架结合AspectJ框架实现的AOP,基于XML方式。
- 第三种方式:Spring框架自己实现的AOP,基于XML配置方式。
实际开发中,都是Spring+AspectJ来实现AOP。所以我们重点学习第一种和第二种方式。
什么是AspectJ?(Eclipse组织的一个支持AOP的框架。AspectJ框架是独立于Spring框架之外的一个框架,Spring框架用了AspectJ)
AspectJ项目起源于帕洛阿尔托(Palo Alto)研究中心(缩写为PARC)。该中心由Xerox集团资助,Gregor Kiczales领导,从1997年开始致力于AspectJ的开发,1998年第一次发布给外部用户,2001年发布1.0 release。为了推动AspectJ技术和社团的发展,PARC在2003年3月正式将AspectJ项目移交给了Eclipse组织,因为AspectJ的发展和受关注程度大大超出了PARC的预期,他们已经无力继续维持它的发展。
15.4.1 准备工作
使用Spring+AspectJ的AOP需要引入的依赖如下:
- pom.xml
<!--spring context依赖-->
<dependency><groupId>org.springframework</groupId><artifactId>spring-context</artifactId><version>6.0.0-M2</version>
</dependency>
<!--spring aop依赖-->
<dependency><groupId>org.springframework</groupId><artifactId>spring-aop</artifactId><version>6.0.0-M2</version>
</dependency>
<!--spring aspects依赖-->
<dependency><groupId>org.springframework</groupId><artifactId>spring-aspects</artifactId><version>6.0.0-M2</version>
</dependency>
Spring配置文件中添加context命名空间和aop命名空间
- spring-aspectj-aop-annotation.xml
<?xml version="1.0" encoding="UTF-8"?>
<beans xmlns="http://www.springframework.org/schema/beans"xmlns:xsi="http://www.w3.org/2001/XMLSchema-instance"xmlns:context="http://www.springframework.org/schema/context"xmlns:aop="http://www.springframework.org/schema/aop"xsi:schemaLocation="http://www.springframework.org/schema/beans http://www.springframework.org/schema/beans/spring-beans.xsdhttp://www.springframework.org/schema/context http://www.springframework.org/schema/context/spring-context.xsdhttp://www.springframework.org/schema/aop http://www.springframework.org/schema/aop/spring-aop.xsd"></beans>
15.4.1.1Spring AOP 基于注解之实现步骤
spring.xml
<?xml version="1.0" encoding="UTF-8"?>
<beans xmlns="http://www.springframework.org/schema/beans"xmlns:xsi="http://www.w3.org/2001/XMLSchema-instance"xmlns:context="http://www.springframework.org/schema/context"xmlns:aop="http://www.springframework.org/schema/aop"xsi:schemaLocation="http://www.springframework.org/schema/beans http://www.springframework.org/schema/beans/spring-beans.xsdhttp://www.springframework.org/schema/context http://www.springframework.org/schema/context/spring-context.xsdhttp://www.springframework.org/schema/aop http://www.springframework.org/schema/aop/spring-aop.xsd"><!--组件扫描--><context:component-scan base-package="com.dong.service"/><!--开启aspectj 自动代理--><!--spring容器在扫描类的时候,查看该类上是否有@Aspect 注解,如果有,则给这个类生成代理对象--><!--proxy-target-class="true"  表示强制使用CGLIB动态代理proxy-target-class="false" 这是默认值,表示接口使用JDK动态代理,反之,使用CGLIB动态代理--><aop:aspectj-autoproxy proxy-target-class="true"/></beans>
UserService.java
package com.dong.service;import org.springframework.stereotype.Service;@Service("userService")
public class UserService {      //目标类public void login(){        //目标方法System.out.println("系统正在验证登录。。。。。。");}
}
LogAspect.java
package com.dong.service;import org.aspectj.lang.annotation.Aspect;
import org.aspectj.lang.annotation.Before;
import org.springframework.stereotype.Component;@Component("logAspect")
@Aspect //切面类是需要使用@Aspect 注解进行标注的
public class LogAspect {    //切面//切面= 通知 + 切点//通知就是增强,就是具体的要编写的增强代码//这里通知Advice以方法的形式出现。(因为方法中可以写代码)// @Before注解标注的方法就是一个前置通知@Before("execution(* com.dong.service.UserService.*(..))")public void 增强(){System.out.println("这是一段增强代码。。。。。。");}}
测试类:SpringAOPTest.java
package com.dong.spring6.test;import com.dong.service.UserService;
import org.junit.Test;
import org.springframework.context.ApplicationContext;
import org.springframework.context.support.ClassPathXmlApplicationContext;public class SpringAOPTest {@Testpublic void testBefore(){ApplicationContext applicationContext=new ClassPathXmlApplicationContext("spring.xml");UserService userService = applicationContext.getBean("userService", UserService.class);userService.login();}
}
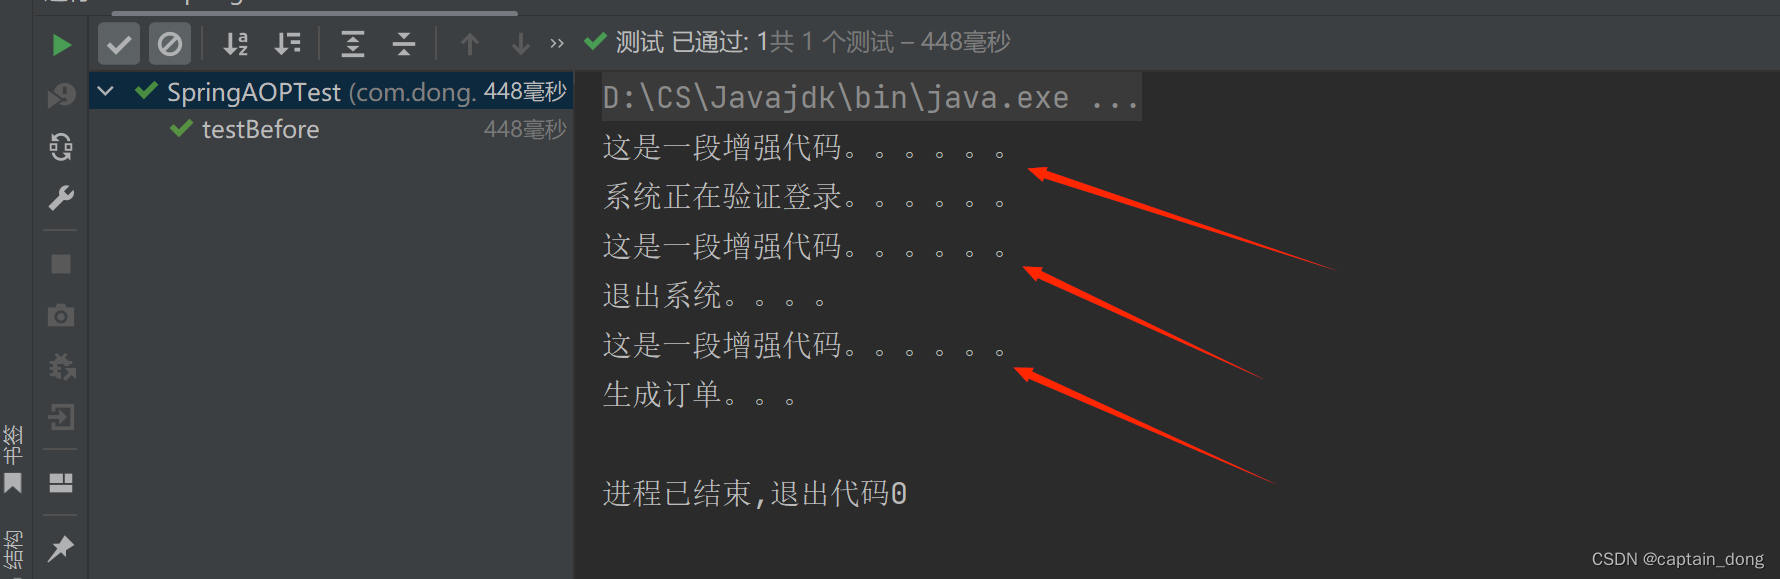
运行结果
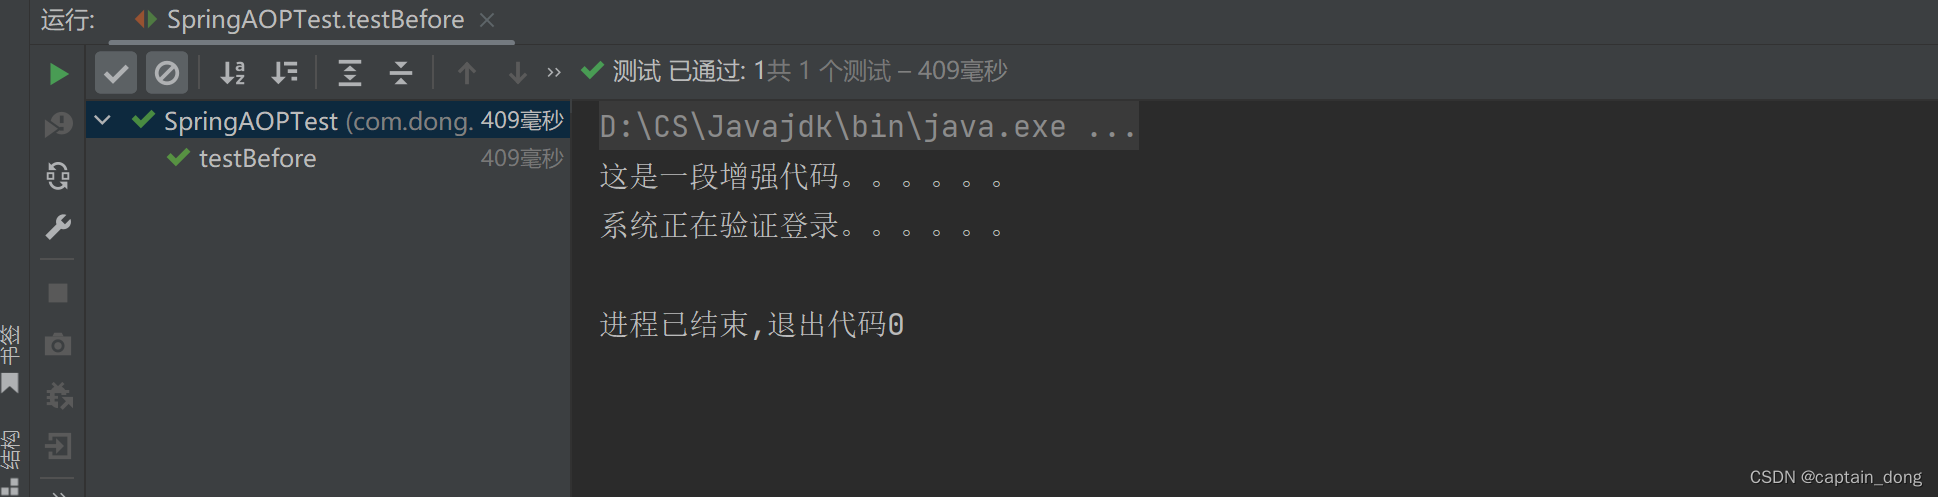
可以看出是一个前置通知。
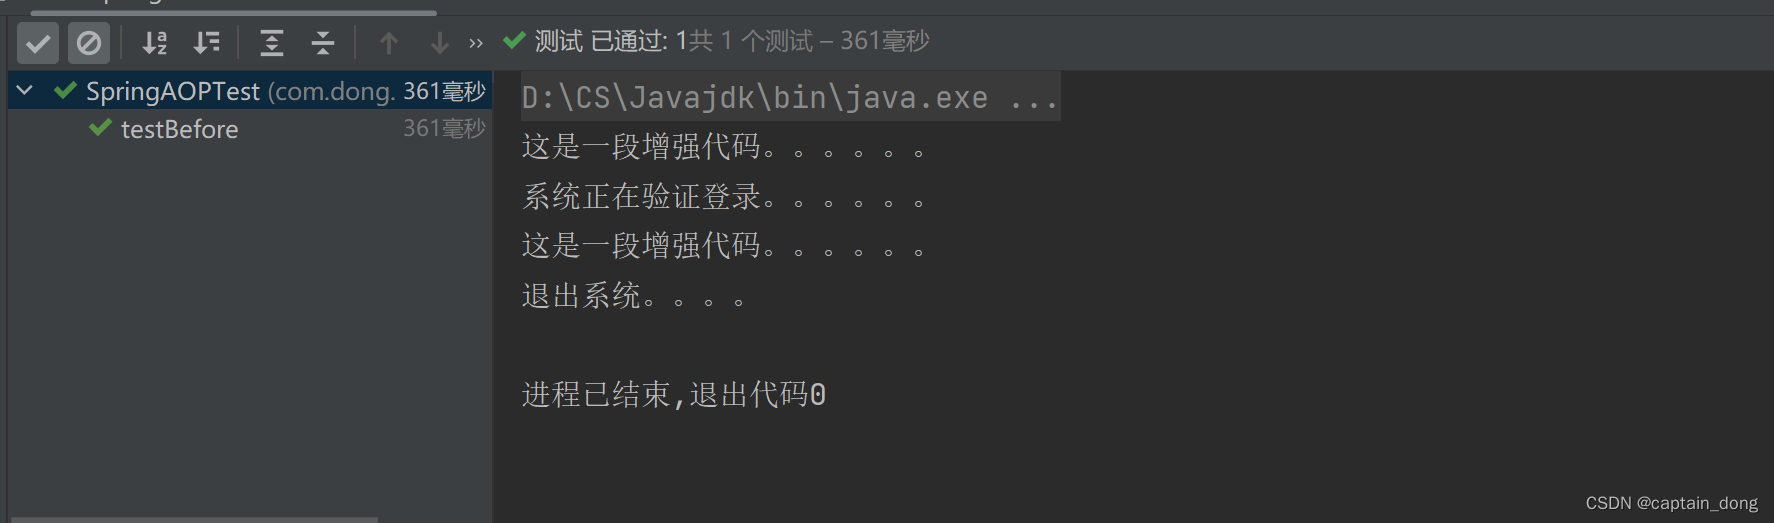
15.4.1.2-Spring AOP 基于注解之切点表达式
代码
package com.dong.service;import org.springframework.stereotype.Service;@Service("userService")
public class UserService {      //目标类public void login(){        //目标方法System.out.println("系统正在验证登录。。。。。。");}public void logout(){System.out.println("退出系统。。。。");}
}
package com.dong.spring6.test;import com.dong.service.UserService;
import org.junit.Test;
import org.springframework.context.ApplicationContext;
import org.springframework.context.support.ClassPathXmlApplicationContext;public class SpringAOPTest {@Testpublic void testBefore(){ApplicationContext applicationContext=new ClassPathXmlApplicationContext("spring.xml");UserService userService = applicationContext.getBean("userService", UserService.class);userService.login();userService.logout();}
}
运行结果:
代码
package com.dong.service;import org.springframework.stereotype.Service;@Service("orderService")
public class OrderService {     //目标类//目标方法public void generate(){System.out.println("生成订单。。。");}
}
package com.dong.service;import org.aspectj.lang.annotation.Aspect;
import org.aspectj.lang.annotation.Before;
import org.springframework.stereotype.Component;@Component("logAspect")
@Aspect //切面类是需要使用@Aspect 注解进行标注的
public class LogAspect {    //切面//切面= 通知 + 切点//通知就是增强,就是具体的要编写的增强代码//这里通知Advice以方法的形式出现。(因为方法中可以写代码)// @Before注解标注的方法就是一个前置通知@Before("execution(* com.dong.service..*(..))")public void 增强(){System.out.println("这是一段增强代码。。。。。。");}}
package com.dong.spring6.test;import com.dong.service.OrderService;
import com.dong.service.UserService;
import org.junit.Test;
import org.springframework.context.ApplicationContext;
import org.springframework.context.support.ClassPathXmlApplicationContext;public class SpringAOPTest {@Testpublic void testBefore(){ApplicationContext applicationContext=new ClassPathXmlApplicationContext("spring.xml");UserService userService = applicationContext.getBean("userService", UserService.class);userService.login();userService.logout();OrderService orderService = applicationContext.getBean("orderService", OrderService.class);orderService.generate();}
}
运行结果
通知类型
通知类型包括:
- 前置通知:@Before 目标方法执行之前的通知
- 后置通知:@AfterReturning 目标方法执行之后的通知
- 环绕通知:@Around 目标方法之前添加通知,同时目标方法执行之后添加通知。
- 异常通知:@AfterThrowing 发生异常之后执行的通知
- 最终通知:@After 放在finally语句块中的通知
代码:
package com.dong.service;import org.aspectj.lang.ProceedingJoinPoint;
import org.aspectj.lang.annotation.*;
import org.springframework.stereotype.Component;@Component("logAspect")
@Aspect //切面类是需要使用@Aspect 注解进行标注的
public class LogAspect {    //切面//切面= 通知 + 切点//通知就是增强,就是具体的要编写的增强代码//这里通知Advice以方法的形式出现。(因为方法中可以写代码)// @Before注解标注的方法就是一个前置通知
/*    @Before("execution(* com.dong.service..*(..))")public void 增强(){System.out.println("这是一段增强代码。。。。。。");}*/@Before("execution(* com.dong.service..*(..))")public void beforeAdvice(){System.out.println("前置通知");}@AfterReturning("execution(* com.dong.service..*(..))")public void afterReturningAdvice(){System.out.println("后置通知");}//环绕通知(环绕是最大的通知,在前置通知之前,在后置通知之后)@Around("execution(* com.dong.service..*(..))")public void aroundAdvice(ProceedingJoinPoint joinPoint) throws Throwable {//前面的代码System.out.println("前环绕");//执行目标joinPoint.proceed();    //执行目标//后面的代码System.out.println("后环绕");}//异常通知
/*    @AfterThrowing("execution(* com.dong.service..*(..))")public void afterThrowingAdvice(){System.out.println("异常通知");}*///最终通知(Finally语句块中的通知)@After("execution(* com.dong.service..*(..))")public void afterAdvice(){System.out.println("最终通知");}}
package com.dong.spring6.test;import com.dong.service.OrderService;
import com.dong.service.UserService;
import org.junit.Test;
import org.springframework.context.ApplicationContext;
import org.springframework.context.support.ClassPathXmlApplicationContext;public class SpringAOPTest {@Testpublic void testBefore(){ApplicationContext applicationContext=new ClassPathXmlApplicationContext("spring.xml");/*        UserService userService = applicationContext.getBean("userService", UserService.class);userService.login();userService.logout();*/OrderService orderService = applicationContext.getBean("orderService", OrderService.class);orderService.generate();}
}
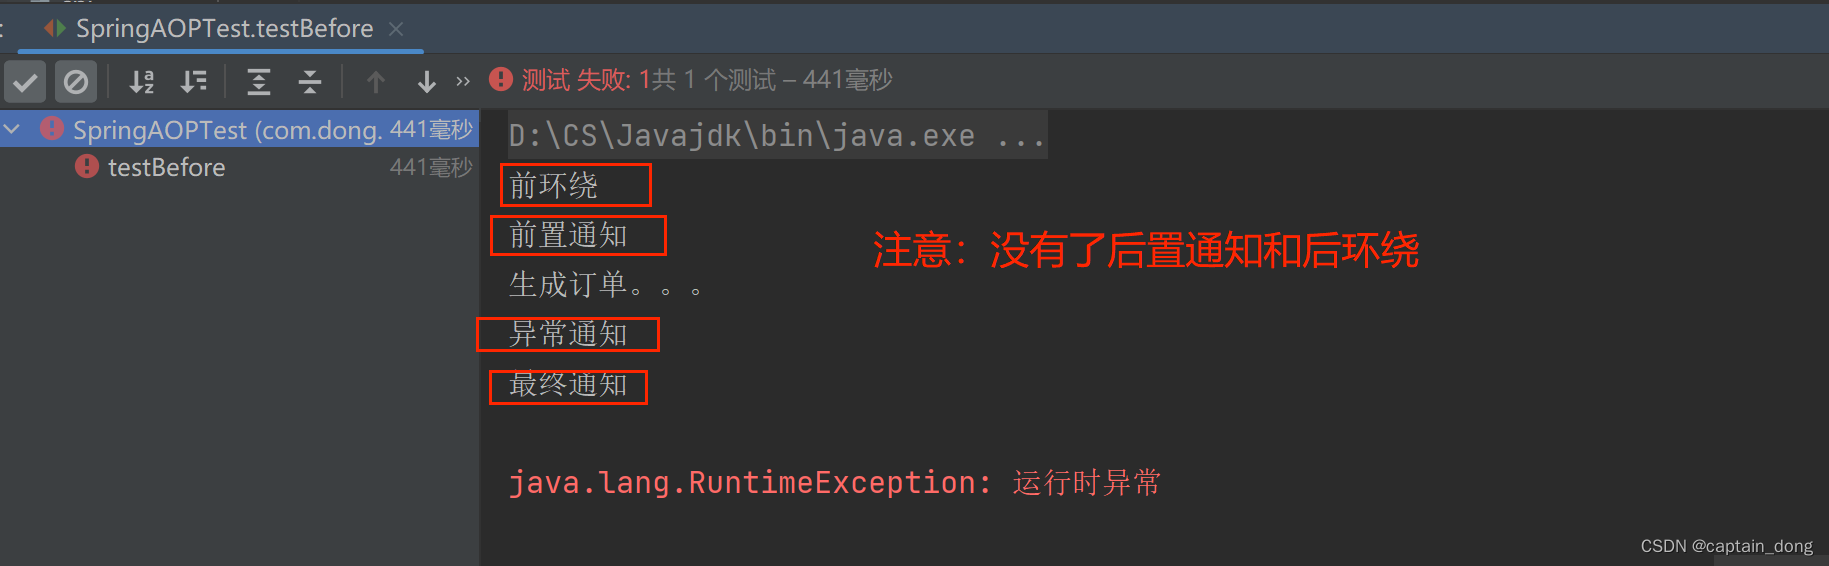
运行结果

加上异常:
代码
package com.dong.service;import org.springframework.stereotype.Service;@Service("orderService")
public class OrderService {     //目标类//目标方法public void generate(){System.out.println("生成订单。。。");if (1==1){throw new RuntimeException("运行时异常");}}
}
//异常通知@AfterThrowing("execution(* com.dong.service..*(..))")public void afterThrowingAdvice(){System.out.println("异常通知");}运行结果
切面的先后顺序
我们知道,业务流程当中不一定只有一个切面,可能有的切面控制事务,有的记录日志,有的进行安全控制,如果多个切面的话,顺序如何控制:可以使用@Order注解来标识切面类,为@Order注解的value指定一个整数型的数字,数字越小,优先级越高。
再定义一个切面类,如下:
-
另一个切面类,并设置优先级
package com.dong.spring6.service;import org.aspectj.lang.ProceedingJoinPoint;
import org.aspectj.lang.annotation.*;
import org.springframework.core.annotation.Order;
import org.springframework.stereotype.Component;@Aspect
@Component
@Order(1) //设置优先级
public class YourAspect {@Around("execution(* com.powernode.spring6.service.OrderService.*(..))")public void aroundAdvice(ProceedingJoinPoint proceedingJoinPoint) throws Throwable {System.out.println("YourAspect环绕通知开始");// 执行目标方法。proceedingJoinPoint.proceed();System.out.println("YourAspect环绕通知结束");}@Before("execution(* com.powernode.spring6.service.OrderService.*(..))")public void beforeAdvice(){System.out.println("YourAspect前置通知");}@AfterReturning("execution(* com.powernode.spring6.service.OrderService.*(..))")public void afterReturningAdvice(){System.out.println("YourAspect后置通知");}@AfterThrowing("execution(* com.powernode.spring6.service.OrderService.*(..))")public void afterThrowingAdvice(){System.out.println("YourAspect异常通知");}@After("execution(* com.powernode.spring6.service.OrderService.*(..))")public void afterAdvice(){System.out.println("YourAspect最终通知");}
}
-
设置切面类MyAspect的优先级
package com.dong.spring6.service;import org.aspectj.lang.ProceedingJoinPoint;
import org.aspectj.lang.annotation.*;
import org.springframework.core.annotation.Order;
import org.springframework.stereotype.Component;// 切面类
@Component
@Aspect
@Order(2) //设置优先级
public class MyAspect {@Around("execution(* com.powernode.spring6.service.OrderService.*(..))")public void aroundAdvice(ProceedingJoinPoint proceedingJoinPoint) throws Throwable {System.out.println("环绕通知开始");// 执行目标方法。proceedingJoinPoint.proceed();System.out.println("环绕通知结束");}@Before("execution(* com.powernode.spring6.service.OrderService.*(..))")public void beforeAdvice(){System.out.println("前置通知");}@AfterReturning("execution(* com.powernode.spring6.service.OrderService.*(..))")public void afterReturningAdvice(){System.out.println("后置通知");}@AfterThrowing("execution(* com.powernode.spring6.service.OrderService.*(..))")public void afterThrowingAdvice(){System.out.println("异常通知");}@After("execution(* com.powernode.spring6.service.OrderService.*(..))")public void afterAdvice(){System.out.println("最终通知");}}
执行测试程序:
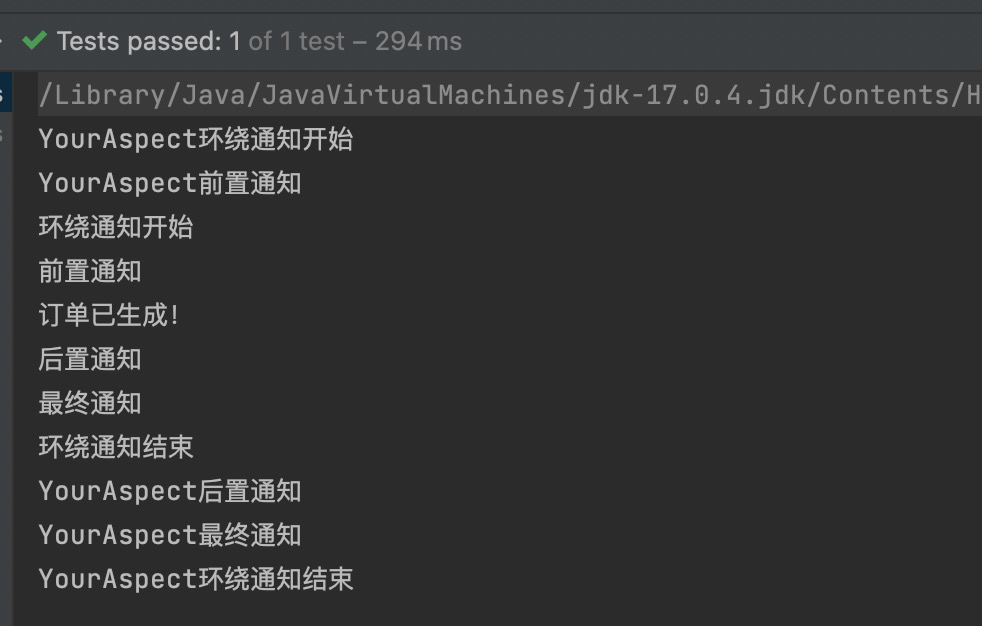
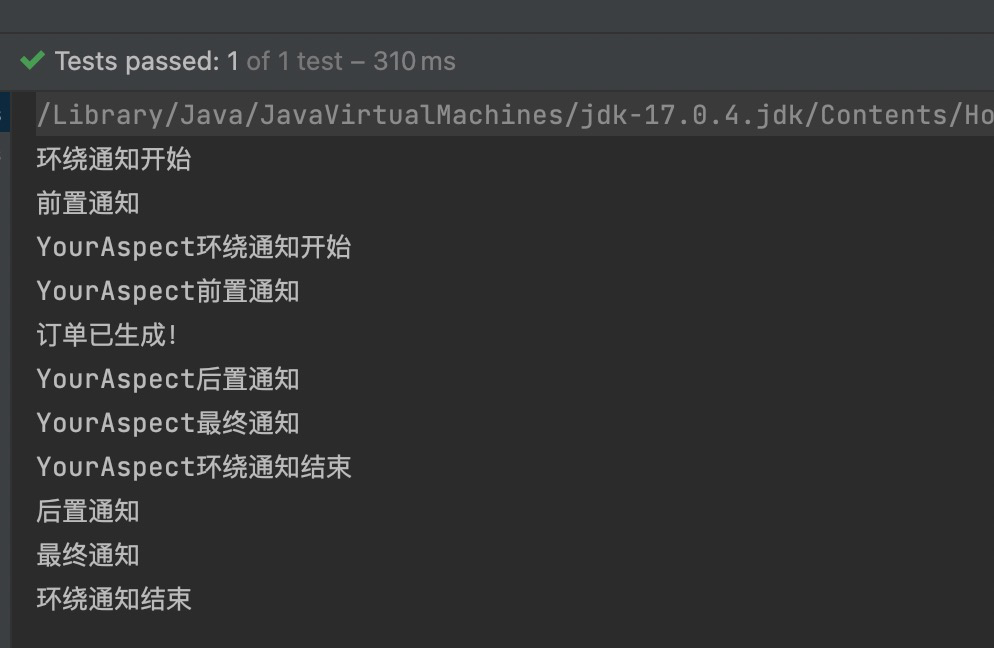
通过修改@Order注解的整数值来切换顺序,执行测试程序:
优化使用切点表达式
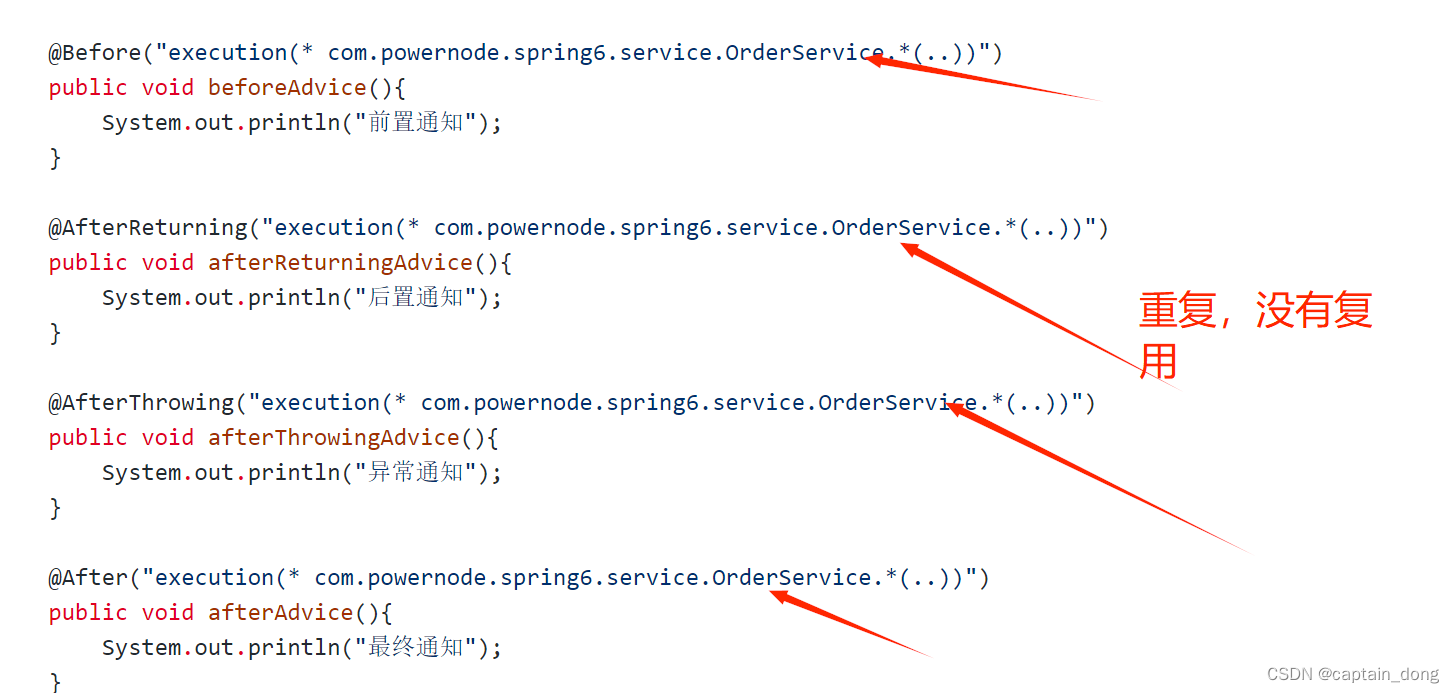
缺点是:
- 第一:切点表达式重复写了多次,没有得到复用。
- 第二:如果要修改切点表达式,需要修改多处,难维护。
可以这样做:将切点表达式单独的定义出来,在需要的位置引入即可。如下:
package com.dong.service;import org.aspectj.lang.ProceedingJoinPoint;
import org.aspectj.lang.annotation.*;
import org.springframework.stereotype.Component;@Component("logAspect")
@Aspect //切面类是需要使用@Aspect 注解进行标注的
public class LogAspect {    //切面//切面= 通知 + 切点//通知就是增强,就是具体的要编写的增强代码//这里通知Advice以方法的形式出现。(因为方法中可以写代码)// @Before注解标注的方法就是一个前置通知
/*    @Before("execution(* com.dong.service..*(..))")public void 增强(){System.out.println("这是一段增强代码。。。。。。");}*///定义通用切点@Pointcut("execution(* com.dong.service..*(..))")public void 通用切点(){//这个方法只是一个标记,方法名随意,方法体中也不需要写任何代码}@Before("通用切点()")public void beforeAdvice(){System.out.println("前置通知");}@AfterReturning("通用切点()")public void afterReturningAdvice(){System.out.println("后置通知");}//环绕通知(环绕是最大的通知,在前置通知之前,在后置通知之后)@Around("通用切点()")public void aroundAdvice(ProceedingJoinPoint joinPoint) throws Throwable {//前面的代码System.out.println("前环绕");//执行目标joinPoint.proceed();    //执行目标//后面的代码System.out.println("后环绕");}//异常通知@AfterThrowing("通用切点()")public void afterThrowingAdvice(){System.out.println("异常通知");}//最终通知(Finally语句块中的通知)@After("通用切点()")public void afterAdvice(){System.out.println("最终通知");}}
使用@Pointcut注解来定义独立的切点表达式。
注意这个@Pointcut注解标注的方法随意,只是起到一个能够让@Pointcut注解编写的位置。
执行测试程序:

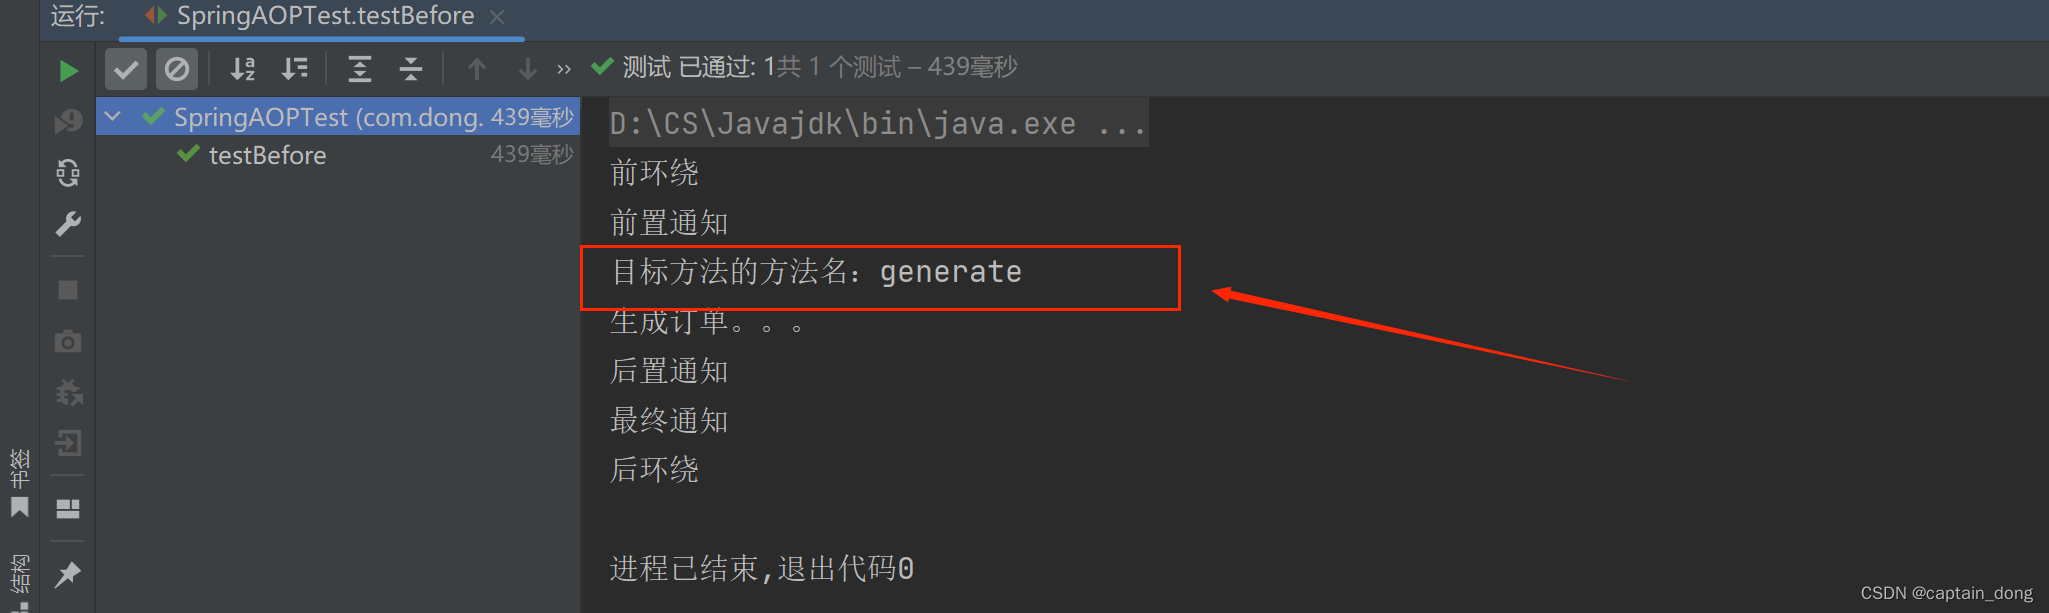
小细节---Spring AOP基于注解之连接点
测试代码
@Before("通用切点()")public void beforeAdvice(JoinPoint joinPoint){System.out.println("前置通知");//这个JoinPoint joinPoint,在Spring容器调用这个方法的时候自动传过来//Signature signature = joinPoint.getSignature();获取目标方法的签名。//通过方法的签名可以获取到一个方法的具体信息。//获取目标方法的方法名System.out.println("目标方法的方法名:"+joinPoint.getSignature().getName());//获取目标方法的的方法修饰符//获取目标方法的方法返回值}运行结果
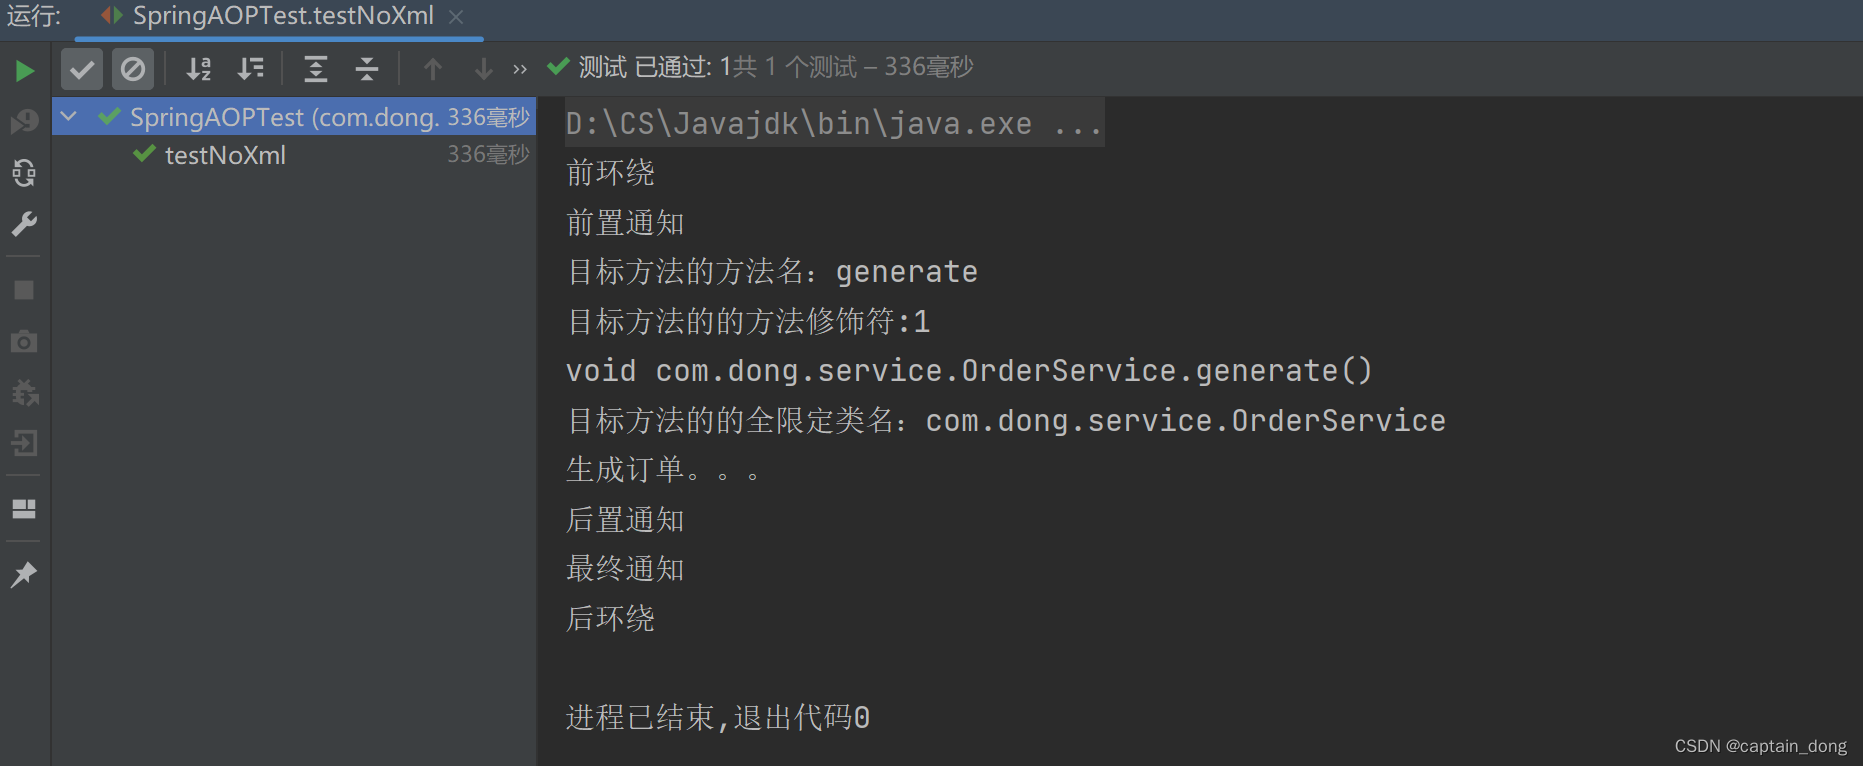
代码
@Before("通用切点()")public void beforeAdvice(JoinPoint joinPoint){System.out.println("前置通知");//这个JoinPoint joinPoint,在Spring容器调用这个方法的时候自动传过来//Signature signature = joinPoint.getSignature();获取目标方法的签名。//通过方法的签名可以获取到一个方法的具体信息。//获取目标方法的方法名System.out.println("目标方法的方法名:"+joinPoint.getSignature().getName());//获取目标方法的的方法修饰符System.out.println("目标方法的的方法修饰符:"+joinPoint.getSignature().getModifiers());//获取目标方法的方法返回值System.out.println(joinPoint.getSignature());System.out.println("目标方法的的全限定类名:"+joinPoint.getSignature().getDeclaringTypeName());}运行结果

全注解式开发AOP
代码【编写一个类】
package com.dong.service;import org.springframework.context.annotation.ComponentScan;
import org.springframework.context.annotation.Configuration;
import org.springframework.context.annotation.EnableAspectJAutoProxy;@Configuration//代替spring.xml 文件
@ComponentScan({"com.dong.service"})
@EnableAspectJAutoProxy(proxyTargetClass = true)//启用aspect的自动代理
public class SpringConfig {
}
//全注解式开发@Testpublic void testNoXml(){ApplicationContext applicationContext=new AnnotationConfigApplicationContext(SpringConfig.class);OrderService orderService = applicationContext.getBean("orderService", OrderService.class);orderService.generate();}运行结果
15.4.3 基于XML配置方式的AOP(了解)
15.5 AOP的实际案例:事务处理
项目中的事务控制是在所难免的。在一个业务流程当中,可能需要多条DML语句共同完成,为了保证数据的安全,这多条DML语句要么同时成功,要么同时失败。这就需要添加事务控制的代码。例如以下伪代码:
- 伪代码
class 业务类1{public void 业务方法1(){try{// 开启事务startTransaction();// 执行核心业务逻辑step1();step2();step3();....// 提交事务commitTransaction();}catch(Exception e){// 回滚事务rollbackTransaction();}}public void 业务方法2(){try{// 开启事务startTransaction();// 执行核心业务逻辑step1();step2();step3();....// 提交事务commitTransaction();}catch(Exception e){// 回滚事务rollbackTransaction();}}public void 业务方法3(){try{// 开启事务startTransaction();// 执行核心业务逻辑step1();step2();step3();....// 提交事务commitTransaction();}catch(Exception e){// 回滚事务rollbackTransaction();}}
}class 业务类2{public void 业务方法1(){try{// 开启事务startTransaction();// 执行核心业务逻辑step1();step2();step3();....// 提交事务commitTransaction();}catch(Exception e){// 回滚事务rollbackTransaction();}}public void 业务方法2(){try{// 开启事务startTransaction();// 执行核心业务逻辑step1();step2();step3();....// 提交事务commitTransaction();}catch(Exception e){// 回滚事务rollbackTransaction();}}public void 业务方法3(){try{// 开启事务startTransaction();// 执行核心业务逻辑step1();step2();step3();....// 提交事务commitTransaction();}catch(Exception e){// 回滚事务rollbackTransaction();}}
}
//......
可以看到,这些业务类中的每一个业务方法都是需要控制事务的,而控制事务的代码又是固定的格式,都是:
try{// 开启事务startTransaction();// 执行核心业务逻辑//......// 提交事务commitTransaction();
}catch(Exception e){// 回滚事务rollbackTransaction();
}这个控制事务的代码就是和业务逻辑没有关系的“交叉业务”。以上伪代码当中可以看到这些交叉业务的代码没有得到复用,并且如果这些交叉业务代码需要修改,那必然需要修改多处,难维护,怎么解决?
可以采用AOP思想解决。可以把以上控制事务的代码作为环绕通知,切入到目标类的方法当中。接下来我们做一下这件事,有两个业务类,如下:
代码
spring.xml
<?xml version="1.0" encoding="UTF-8"?>
<beans xmlns="http://www.springframework.org/schema/beans"xmlns:xsi="http://www.w3.org/2001/XMLSchema-instance"xmlns:context="http://www.springframework.org/schema/context"xmlns:aop="http://www.springframework.org/schema/aop"xsi:schemaLocation="http://www.springframework.org/schema/beans http://www.springframework.org/schema/beans/spring-beans.xsdhttp://www.springframework.org/schema/context http://www.springframework.org/schema/context/spring-context.xsdhttp://www.springframework.org/schema/aop http://www.springframework.org/schema/aop/spring-aop.xsd"><!--组件扫描--><context:component-scan base-package="com.dong.spring6.service"/><!--启动自动代理--><aop:aspectj-autoproxy/>
</beans>
银行账户的业务类
package com.dong.spring6.service;import org.springframework.stereotype.Service;@Service
public class AccountService {        //目标对象//目标方法//转账的业务方法public void transfer(){System.out.println("银行账户正在完成转账操作....");}//目标方法//取款的业务方法public void withdraw(){System.out.println("正在取款,请稍后......");}
}
订单业务类
package com.dong.spring6.service;import org.springframework.stereotype.Service;@Service
public class OrderService {     //目标对象//目标方法//生成订单的业务方法public void generate(){System.out.println("正在生成订单.....");}//目标方法//订单取消的业务方法public void cancel(){System.out.println("订单取消...");}
}
注意,以上两个业务类已经纳入spring bean的管理,因为都添加了@Component注解。
接下来我们给以上两个业务类的4个方法添加事务控制代码,使用AOP来完成:
事务切面类
package com.dong.spring6.service;import org.aspectj.lang.ProceedingJoinPoint;
import org.aspectj.lang.annotation.Around;
import org.aspectj.lang.annotation.Aspect;
import org.springframework.stereotype.Component;/*** 切面*/
@Component
@Aspect
public class TransactionAspect {@Around("execution(* com.dong.spring6.service..*(..))")public void aroundAdvice(ProceedingJoinPoint joinPoint){//执行目标try {//前环绕System.out.println("开启事务.....");//执行目标joinPoint.proceed();//后环绕System.out.println("提交事务.....");} catch (Throwable e) {System.out.println("回滚事务");}}
}
上述事务控制代码只需要写一次就行了,并且修改起来也没有成本。
编写测试程序:
package com.dong.spring6.test;import com.dong.spring6.service.AccountService;
import com.dong.spring6.service.OrderService;
import org.junit.Test;
import org.springframework.context.ApplicationContext;
import org.springframework.context.annotation.AnnotationConfigApplicationContext;
import org.springframework.context.support.ClassPathXmlApplicationContext;public class AOPRealAppTest {//编程式事务解决方案。@Testpublic void testTransaction(){ApplicationContext applicationContext=new ClassPathXmlApplicationContext("spring.xml");AccountService accountService = applicationContext.getBean("accountService", AccountService.class);OrderService orderService = applicationContext.getBean("orderService", OrderService.class);accountService.transfer();accountService.withdraw();orderService.generate();orderService.cancel();}
}
运行结果

有异常时:
增添代码:
package com.dong.spring6.service;import org.springframework.stereotype.Service;@Service
public class OrderService {     //目标对象//目标方法//生成订单的业务方法public void generate(){System.out.println("正在生成订单.....");}//目标方法//订单取消的业务方法public void cancel(){System.out.println("订单取消...");//空指针异常String s=null;s.toString();}
}
运行结果

15.6 AOP的实际案例:安全日志
需求是这样的:项目开发结束了,已经上线了。运行正常。客户提出了新的需求:凡事在系统中进行修改操作的,删除操作的,新增操作的,都要把这个人记录下来。因为这几个操作是属于危险行为。例如有业务类和业务方法:
spring.xml
<?xml version="1.0" encoding="UTF-8"?>
<beans xmlns="http://www.springframework.org/schema/beans"xmlns:xsi="http://www.w3.org/2001/XMLSchema-instance"xmlns:context="http://www.springframework.org/schema/context"xmlns:aop="http://www.springframework.org/schema/aop"xsi:schemaLocation="http://www.springframework.org/schema/beans http://www.springframework.org/schema/beans/spring-beans.xsdhttp://www.springframework.org/schema/context http://www.springframework.org/schema/context/spring-context.xsdhttp://www.springframework.org/schema/aop http://www.springframework.org/schema/aop/spring-aop.xsd"><!--组件扫描--><context:component-scan base-package="com.dong.spring6"/><!--启动自动代理--><aop:aspectj-autoproxy/>
</beans>
用户业务类
package com.dong.spring6.biz;import org.springframework.stereotype.Service;@Service
public class UserService {public void saveUser(){System.out.println("新增用户信息");}public void deleteUser(){System.out.println("删除用户信息");}public void modifyUser(){System.out.println("修改用户信息");}public void getUser(){System.out.println("获取用户信息");}}
VIP业务类
package com.dong.spring6.biz;import org.springframework.stereotype.Service;@Service
public class VipService {public void saveVip(){System.out.println("新增会员信息");}public void deleteVip(){System.out.println("删除会员信息");}public void modifyVip(){System.out.println("修改会员信息");}public void getVip(){System.out.println("获取会员信息");}}
注意:已经添加了@Servic ( @Component )注解。
接下来我们使用aop来解决上面的需求:
编写一个负责安全的切面类
package com.dong.spring6.biz;import org.aspectj.lang.JoinPoint;
import org.aspectj.lang.annotation.Aspect;
import org.aspectj.lang.annotation.Before;
import org.aspectj.lang.annotation.Pointcut;
import org.springframework.stereotype.Component;import java.text.SimpleDateFormat;
import java.util.Date;@Component
@Aspect
public class SecurityLogAspect {@Pointcut("execution(* com.dong.spring6.biz..save*(..))")public void savePointCut(){}@Pointcut("execution(* com.dong.spring6.biz..delete*(..))")public void deletePointCut(){}@Pointcut("execution(* com.dong.spring6.biz..modify*(..))")public void modifyPointCut(){}@Pointcut("execution(* com.dong.spring6.biz..get*(..))")public void getPointCut(){}@Before("savePointCut()||deletePointCut()||modifyPointCut()")public void beforeAdvice(JoinPoint joinPoint){SimpleDateFormat simpleDateFormat=new SimpleDateFormat("yyyy-MM-dd HH:mm:ss SSS");String nowTime = simpleDateFormat.format(new Date());//输出日志信息System.out.println(nowTime+" zhangsan"+joinPoint.getSignature().getDeclaringTypeName()+"."+joinPoint.getSignature().getName());}
}
测试程序
@Testpublic void testSecurityLog(){ApplicationContext applicationContext=new ClassPathXmlApplicationContext("spring.xml");UserService userService = applicationContext.getBean("userService", UserService.class);VipService vipService = applicationContext.getBean("vipService", VipService.class);userService.saveUser();userService.deleteUser();userService.modifyUser();userService.getUser();vipService.saveVip();vipService.deleteVip();vipService.modifyVip();vipService.getVip();}运行结果

十六、Spring对事务的支持
16.1 事务概述
- 什么是事务
-
- 在一个业务流程当中,通常需要多条DML(insert delete update)语句共同联合才能完成,这多条DML语句必须同时成功,或者同时失败,这样才能保证数据的安全。
- 多条DML要么同时成功,要么同时失败,这叫做事务。
- 事务:Transaction(tx)
- 事务的四个处理过程:
-
- 第一步:开启事务 (start transaction)
- 第二步:执行核心业务代码
- 第三步:提交事务(如果核心业务处理过程中没有出现异常)(commit transaction)
- 第四步:回滚事务(如果核心业务处理过程中出现异常)(rollback transaction)
- 事务的四个特性:
-
- A 原子性:事务是最小的工作单元,不可再分。
- C 一致性:事务要求要么同时成功,要么同时失败。事务前和事务后的总量不变。
- I 隔离性:事务和事务之间因为有隔离性,才可以保证互不干扰。
- D 持久性:持久性是事务结束的标志。
16.2 引入事务场景
以银行账户转账为例学习事务。两个账户act-001和act-002。act-001账户向act-002账户转账10000,必须同时成功,或者同时失败。(一个减成功,一个加成功, 这两条update语句必须同时成功,或同时失败。)
连接数据库的技术采用Spring框架的JdbcTemplate。
采用三层架构搭建:
模块名:spring6-013-tx-bank(依赖如下)
pom.xml
<?xml version="1.0" encoding="UTF-8"?>
<project xmlns="http://maven.apache.org/POM/4.0.0"xmlns:xsi="http://www.w3.org/2001/XMLSchema-instance"xsi:schemaLocation="http://maven.apache.org/POM/4.0.0 http://maven.apache.org/xsd/maven-4.0.0.xsd"><modelVersion>4.0.0</modelVersion><groupId>com.dong</groupId><artifactId>spring6-013-tx-bank</artifactId><version>1.0-SNAPSHOT</version><packaging>jar</packaging><!--依赖--><dependencies><!--spring context依赖--><dependency><groupId>org.springframework</groupId><artifactId>spring-context</artifactId><version>6.0.11</version></dependency><!--spring aspects依赖--><dependency><groupId>org.springframework</groupId><artifactId>spring-aspects</artifactId><version>6.0.11</version></dependency><!--junit依赖--><dependency><groupId>junit</groupId><artifactId>junit</artifactId><version>4.13.2</version><scope>test</scope></dependency><!--spring jdbc--><dependency><groupId>org.springframework</groupId><artifactId>spring-jdbc</artifactId><version>6.0.11</version></dependency><!--mysql驱动--><dependency><groupId>mysql</groupId><artifactId>mysql-connector-java</artifactId><version>8.0.33</version></dependency><!--德鲁伊连接池--><dependency><groupId>com.alibaba</groupId><artifactId>druid</artifactId><version>1.2.16</version></dependency><!--@Resource注解--><dependency><groupId>jakarta.annotation</groupId><artifactId>jakarta.annotation-api</artifactId><version>2.1.1</version></dependency></dependencies><properties><maven.compiler.source>19</maven.compiler.source><maven.compiler.target>19</maven.compiler.target><project.build.sourceEncoding>UTF-8</project.build.sourceEncoding></properties></project>
第一步:准备数据库表
表结构

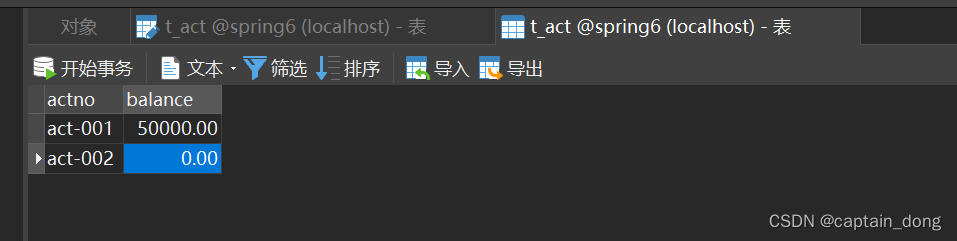
表数据
第二步:创建包结构
com.dong.bank.pojo
com.dong.bank.service
com.dong.bank.service.impl
com.dong.bank.dao
com.dong.bank.dao.impl
第三步:准备POJO类
package com.dong.bank.pojo;public class Account {private String actno;private double balance;@Overridepublic String toString() {return "Account{" +"actno='" + actno + '\'' +", balance=" + balance +'}';}public Account() {}public Account(String actno, double balance) {this.actno = actno;this.balance = balance;}public String getActno() {return actno;}public void setActno(String actno) {this.actno = actno;}public double getBalance() {return balance;}public void setBalance(double balance) {this.balance = balance;}
}
第四步:编写持久层
package com.dong.bank.dao;import com.dong.bank.pojo.Account;public interface AccountDao {/*** 根据账号查询账户信息* @param actno* @return*/Account selectByActNo(String actno);/*** 更新账户信息* @param account* @return*/int update(Account account);
}
package com.dong.bank.dao.impl;import com.dong.bank.dao.AccountDao;
import com.dong.bank.pojo.Account;
import jakarta.annotation.Resource;
import org.springframework.jdbc.core.BeanPropertyRowMapper;
import org.springframework.jdbc.core.JdbcTemplate;
import org.springframework.stereotype.Repository;@Repository("accountDao")
public class AccountDaoImpl implements AccountDao {@Resource(name = "jdbcTemplate")private JdbcTemplate jdbcTemplate;@Overridepublic Account selectByActNo(String actno) {String sql="select actno, balance from t_act where actno=?";Account account = jdbcTemplate.queryForObject(sql, new BeanPropertyRowMapper<>(Account.class), actno);return account;}@Overridepublic int update(Account account) {String sql="update t_act set balance=? where actno=?";int count = jdbcTemplate.update(sql, account.getBalance(), account.getActno());return count;}
}
第五步:编写业务层
package com.dong.bank.service;/*** 业务接口* 事务就是在这个接口下控制的*/
public interface AccountService {/*** 转账业务方法* @param fromActno 从这个账户转出* @param toActno   转入这个账户* @param money    转账金额*/void transfer(String fromActno,String toActno,double money);}
package com.dong.bank.service.impl;import com.dong.bank.dao.AccountDao;
import com.dong.bank.pojo.Account;
import com.dong.bank.service.AccountService;
import jakarta.annotation.Resource;
import org.springframework.stereotype.Service;@Service("accountService")
public class AccountServiceImpl implements AccountService {@Resource(name = "accountDao")private AccountDao accountDao;//控制事务,因为在这个方法中要完成所有的转账业务@Overridepublic void transfer(String fromActno, String toActno, double money) {//查询转出账户的余额是否充足Account fromAct = accountDao.selectByActNo(fromActno);if (fromAct.getBalance()<money){throw new RuntimeException("余额不足!!!");}//余额充足Account toAct = accountDao.selectByActNo(toActno);//将内存中的两个对象的余额先修改fromAct.setBalance(fromAct.getBalance()-money);toAct.setBalance(fromAct.getBalance()+money);//数据库更新int count = accountDao.update(fromAct);count+=accountDao.update(toAct);if (count!=2){throw new RuntimeException("转账失败,请联系银行!!!");}}
}
第六步:编写Spring配置文件
<?xml version="1.0" encoding="UTF-8"?>
<beans xmlns="http://www.springframework.org/schema/beans"xmlns:xsi="http://www.w3.org/2001/XMLSchema-instance"xmlns:context="http://www.springframework.org/schema/context"xsi:schemaLocation="http://www.springframework.org/schema/beans http://www.springframework.org/schema/beans/spring-beans.xsdhttp://www.springframework.org/schema/context http://www.springframework.org/schema/context/spring-context.xsd"><!--组件扫描--><context:component-scan base-package="com.dong.bank"/><!--配置数据源--><bean id="dataSource" class="com.alibaba.druid.pool.DruidDataSource"><property name="driverClassName" value="com.mysql.cj.jdbc.Driver"/><property name="url" value="jdbc:mysql://localhost:3306/spring6"/><property name="username" value="root"/><property name="password" value="15088143946Sld"/></bean><!--配置jdbcTemplate--><bean id="jdbcTemplate" class="org.springframework.jdbc.core.JdbcTemplate"><property name="dataSource" ref="dataSource"/></bean></beans>
第七步:编写表示层(测试程序)
代码
package com.dong.bank.test;import com.dong.bank.service.AccountService;
import org.junit.Test;
import org.springframework.context.ApplicationContext;
import org.springframework.context.support.ClassPathXmlApplicationContext;public class SpringTxTest {@Testpublic void testSpringTx(){ApplicationContext applicationContext=new ClassPathXmlApplicationContext("spring.xml");AccountService accountService = applicationContext.getBean("accountService", AccountService.class);try {accountService.transfer("act-001", "act-002", 10000);System.out.println("转账成功。");}catch (Exception e){e.printStackTrace();System.out.println("转账失败。");}}
}
执行结果:

数据变化:
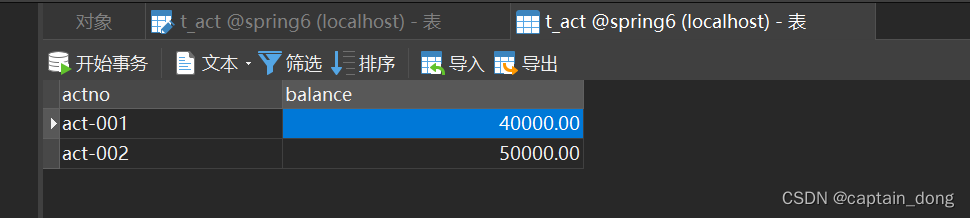
模拟异常
package com.dong.bank.service.impl;import com.dong.bank.dao.AccountDao;
import com.dong.bank.pojo.Account;
import com.dong.bank.service.AccountService;
import jakarta.annotation.Resource;
import org.springframework.stereotype.Service;@Service("accountService")
public class AccountServiceImpl implements AccountService {@Resource(name = "accountDao")private AccountDao accountDao;//控制事务,因为在这个方法中要完成所有的转账业务@Overridepublic void transfer(String fromActno, String toActno, double money) {//第一步:开启事务//第二步:执行核心业务逻辑//查询转出账户的余额是否充足Account fromAct = accountDao.selectByActNo(fromActno);if (fromAct.getBalance()<money){throw new RuntimeException("余额不足!!!");}//余额充足Account toAct = accountDao.selectByActNo(toActno);//将内存中的两个对象的余额先修改fromAct.setBalance(fromAct.getBalance()-money);toAct.setBalance(fromAct.getBalance()+money);//数据库更新int count = accountDao.update(fromAct);count+=accountDao.update(toAct);//模拟异常String s=null;s.toString();if (count!=2){throw new RuntimeException("转账失败,请联系银行!!!");}//第三步:如果执行业务流程过程中,没有异常。提交事务//第四步:如果执行业务流程过程中,有异常,回滚事务}
}
执行结果:

数据库表中数据:
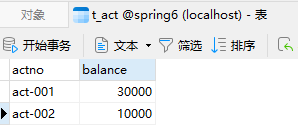
- 转出成功,但是转入失败! 不同步更新!
丢了1万!!!
16.3 Spring对事务的支持
Spring实现事务的两种方式
-
编程式事务
-
- 通过编写代码的方式来实现事务的管理。
-
声明式事务
-
- 基于注解方式
- 基于XML配置方式
Spring事务管理API
Spring对事务的管理底层实现方式是基于AOP实现的。采用AOP的方式进行了封装。所以Spring专门针对事务开发了一套API,API的核心接口如下:
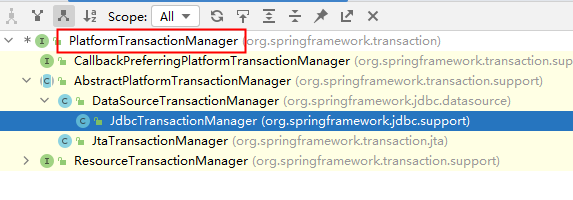
PlatformTransactionManager接口:spring事务管理器的核心接口。在Spring6中它有两个实现:
- DataSourceTransactionManager:支持JdbcTemplate、MyBatis、Hibernate等事务管理。
- JtaTransactionManager:支持分布式事务管理。
如果要在Spring6中使用JdbcTemplate,就要使用DataSourceTransactionManager来管理事务。(Spring内置写好了,可以直接用。)
声明式事务之注解实现方式
- 第一步:在spring配置文件中配置事务管理器。
- 第二步:在spring配置文件中引入tx命名空间。
- 第三步:在spring配置文件中配置“事务注解驱动器”,开始注解的方式控制事务。
- 第四步:在service类上或方法上添加@Transactional注解
在类上添加该注解,该类中所有的方法都有事务。在某个方法上添加该注解,表示只有这个方法使用事务。