做网站卖资料搜索引擎大全入口
网格入门
本指南演示了如何启动和运行 Kendo UI for jQuery Grid。
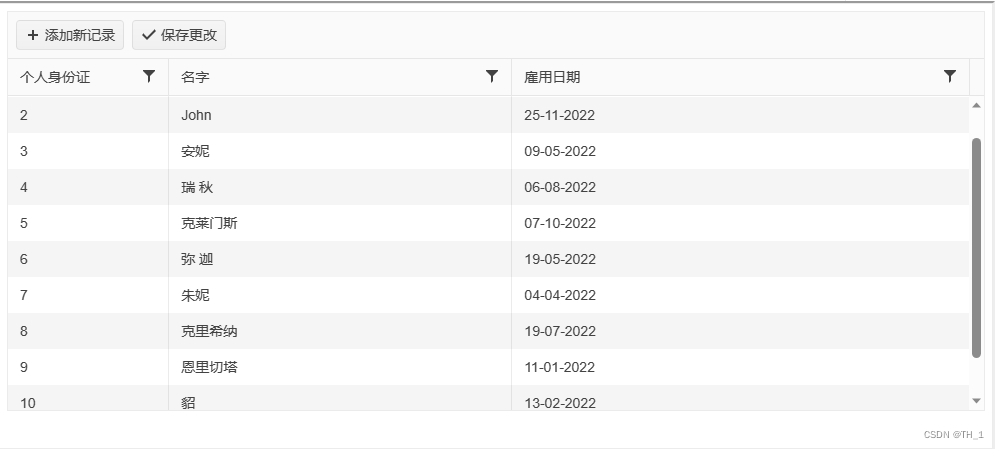
完成本指南后,您将能够实现以下最终结果:
1. 创建一个空的 div 元素
首先,在页面上创建一个空元素,该元素将用作 Grid 组件的主容器。
<div id="my-grid"></div>
2. 初始化网格
在此步骤中,您将从空元素初始化网格。当你从空初始化组件时,网格的所有设置都将在初始化脚本语句中提供,你必须用JavaScript描述它的布局和配置。div
有关替代初始化方法的详细信息,请参阅有关从 HTML 表初始化网格的文章。
<div id="my-grid"></div><script>// Target the div element by using jQuery and then call the kendoGrid() method.$("#my-grid").kendoGrid({// Add some basic configurations such as width and height.width: "700px",height: "400px"});
</script>
3. 将网格绑定到数据
基本初始化完成后,可以开始向网格添加其他配置。第一个也是最重要的配置是dataSource.
<div id="my-grid"></div><script>let myDataArray = [{ID: 1, Name: "Tom", Date: "10/15/2022"},{ID: 2, Name: "John", Date: "11/25/2022"},{ID: 3, Name: "Annie", Date: "05/09/2022"},{ID: 4, Name: "Rachel", Date: "08/06/2022"},{ID: 5, Name: "Klemens", Date: "10/07/2022"},{ID: 6, Name: "Micah", Date: "05/19/2022"},{ID: 7, Name: "Junie", Date: "04/04/2022"},{ID: 8, Name: "Krishnah", Date: "07/19/2022"},{ID: 9, Name: "Enrichetta", Date: "01/11/2022"},{ID: 10, Name: "Marten", Date: "02/13/2022"},{ID: 11, Name: "Rosmunda", Date: "08/15/2022"},];// Target the div element by using jQuery and then call the kendoGrid() method.$("#my-grid").kendoGrid({width: "700px",height: "400px",dataSource: {data: myDataArray,schema: {model: {id: "ID", // The ID field is a unique identifier that allows the dataSource to distinguish different elements.fields: {ID: { type: "number", editable: false }, // The ID field in this case is a number. Additionally, do not allow users to edit this field.Name: { type: "string", editable: false },Date: { type: "date", editable: false }}}}}});
</script>
4. 配置网格列
网格允许您配置每个单独的列并应用一组列属性。
<div id="my-grid"></div><script>let myDataArray = [{ID: 1, Name: "Tom", Date: "10/15/2022"},{ID: 2, Name: "John", Date: "11/25/2022"},{ID: 3, Name: "Annie", Date: "05/09/2022"},{ID: 4, Name: "Rachel", Date: "08/06/2022"},{ID: 5, Name: "Klemens", Date: "10/07/2022"},{ID: 6, Name: "Micah", Date: "05/19/2022"},{ID: 7, Name: "Junie", Date: "04/04/2022"},{ID: 8, Name: "Krishnah", Date: "07/19/2022"},{ID: 9, Name: "Enrichetta", Date: "01/11/2022"},{ID: 10, Name: "Marten", Date: "02/13/2022"},{ID: 11, Name: "Rosmunda", Date: "08/15/2022"},];$("#my-grid").kendoGrid({width: "700px",height: "400px"// The columns configuration is an array of objects.columns: [// The field matches the ID property in the data array.{ field: "ID", title: "Personal Id", width: "70px" },{ field: "Name", title: "First Name", width: "150px" },{ field: "Date", title: "Hire Date", width: "200px", format: "{0:dd-MM-yyyy}" }],dataSource: {data: myDataArray,schema: {model: {id: "ID",fields: {ID: { type: "number", editable: false },Name: { type: "string", editable: false },Date: { type: "date", editable: false }}}}}});
</script>
5.添加编辑和过滤
除其他功能外,网格还支持编辑和过滤。编辑配置允许用户编辑单个网格单元格。筛选配置允许用户筛选网格内的数据。
<div id="my-grid"></div><script>let myDataArray = [{ID: 1, Name: "Tom", Date: "10/15/2022"},{ID: 2, Name: "John", Date: "11/25/2022"},{ID: 3, Name: "Annie", Date: "05/09/2022"},{ID: 4, Name: "Rachel", Date: "08/06/2022"},{ID: 5, Name: "Klemens", Date: "10/07/2022"},{ID: 6, Name: "Micah", Date: "05/19/2022"},{ID: 7, Name: "Junie", Date: "04/04/2022"},{ID: 8, Name: "Krishnah", Date: "07/19/2022"},{ID: 9, Name: "Enrichetta", Date: "01/11/2022"},{ID: 10, Name: "Marten", Date: "02/13/2022"},{ID: 11, Name: "Rosmunda", Date: "08/15/2022"},];$("#my-grid").kendoGrid({width: "700px",height: "400px"// Add toolbar buttons for creating and saving buttons.toolbar: ["create", "save"],// Enable the filtering functionality.filterable: true,// Enable the editing functionality (incell by default).editable: true,// The columns configuration is an array of objects.columns: [// The field matches the ID property in the data array.{ field: "ID", title: "Personal Id", width: "70px" },{ field: "Name", title: "First Name", width: "150px" },{ field: "Date", title: "Hire Date", width: "200px", format: "{0:dd-MM-yyyy}" }],dataSource: {data: myDataArray,schema: {model: {id: "ID",fields: {ID: { type: "number", editable: false },Name: { type: "string", editable: false },Date: { type: "date", editable: false }}}}}});
</script>
完整代码:
<!DOCTYPE html>
<html lang="en"><head><meta charset="UTF-8"><meta http-equiv="X-UA-Compatible" content="IE=edge"><meta name="viewport" content="width=device-width, initial-scale=1.0"><title>网格入门</title><link href="../../../../styles/kendo.common.min.css" rel="stylesheet" /><link href="../../../../styles/kendo.default.min.css" rel="stylesheet" /><script src="../../../../js/jquery.min.js"></script><script src="../../../../js/kendo.web.min.js"></script>
</head>
<!-- 本指南演示了如何启动和运行 Kendo UI for jQuery Grid。 --><body><!-- 1. 创建一个空的 div 元素首先,在页面上创建一个空元素,该元素将用作 Grid 组件的主容器。 --><div id="my-grid"></div><script>/** 3. 将网格绑定到数据基本初始化完成后,可以开始向网格添加其他配置。第一个也是最重要的配置是dataSource.*/let myDataArray = [{ ID: 1, Name: "Tom", Date: "10/15/2022" },{ ID: 2, Name: "John", Date: "11/25/2022" },{ ID: 3, Name: "Annie", Date: "05/09/2022" },{ ID: 4, Name: "Rachel", Date: "08/06/2022" },{ ID: 5, Name: "Klemens", Date: "10/07/2022" },{ ID: 6, Name: "Micah", Date: "05/19/2022" },{ ID: 7, Name: "Junie", Date: "04/04/2022" },{ ID: 8, Name: "Krishnah", Date: "07/19/2022" },{ ID: 9, Name: "Enrichetta", Date: "01/11/2022" },{ ID: 10, Name: "Marten", Date: "02/13/2022" },{ ID: 11, Name: "Rosmunda", Date: "08/15/2022" },];/** 2. 初始化网格在此步骤中,您将从空元素初始化网格。当你从空初始化组件时,网格的所有设置都将在初始化脚本语句中提供,你必须用JavaScript描述它的布局和配置。<div>div */$("#my-grid").kendoGrid({width: "700px",height: "400px",/** 5.添加编辑和过滤除其他功能外,网格还支持编辑和过滤。编辑配置允许用户编辑单个网格单元格。筛选配置允许用户筛选网格内的数据。*/// Add toolbar buttons for creating and saving buttons.toolbar: ["create", "save"],// Enable the filtering functionality.filterable: true,// Enable the editing functionality (incell by default).editable: true,// The columns configuration is an array of objects./** 4. 配置网格列网格允许您配置每个单独的列并应用一组列属性。*/// The columns configuration is an array of objects.columns: [// The field matches the ID property in the data array.{ field: "ID", title: "Personal Id", width: "70px" },{ field: "Name", title: "First Name", width: "150px" },{ field: "Date", title: "Hire Date", width: "200px", format: "{0:dd-MM-yyyy}" }],dataSource: {data: myDataArray,schema: {model: {id: "ID",fields: {ID: { type: "number", editable: false },Name: { type: "string", },Date: { type: "date",  }}}}}});</script>
</body></html>