微信小程序注册代码广东seo推广外包
目录
- 前言
- 1. python-ort
- 2. C++-ort
- 总结
前言
杜老师推出的 tensorRT从零起步高性能部署 课程,之前有看过一遍,但是没有做笔记,很多东西也忘了。这次重新撸一遍,顺便记记笔记。
本次课程学习 tensorRT 高级-使用 onnxruntime 进行 onnx 模型推理过程
课程大纲可看下面的思维导图

1. python-ort
这节课我们学习 onnxruntime 案例
1. onnx 是 Microsoft 开发的一个中间格式,而 onnxruntime 简称 ort 是 Microsoft 为 onnx 开发的推理引擎
2. 允许使用 onnx 作为输入进行直接推理得到结果
3. onnxruntime 有 python/c++ 接口,支持 CPU、CUDA、tensorRT 等不同后端,实际 CPU 上比较常用
4. ort 甚至在未来还提供了训练功能
5. 学习使用 onnxruntime 推理 YoloV5 并拿到结果
我们来看案例,先把 onnx 导出来,如下所示:

导出之后,我们再执行 pytorch 推理,如下所示:

执行成功,执行后的效果图如下所示:

我们再来看下 python-ort 推理的效果,代码如下:
import onnxruntime
import cv2
import numpy as npdef preprocess(image, input_w=640, input_h=640):scale = min(input_h / image.shape[0], input_w / image.shape[1])ox = (-scale * image.shape[1] + input_w + scale  - 1) * 0.5oy = (-scale * image.shape[0] + input_h + scale  - 1) * 0.5M = np.array([[scale, 0, ox],[0, scale, oy]], dtype=np.float32)IM = cv2.invertAffineTransform(M)image_prep = cv2.warpAffine(image, M, (input_w, input_h), flags=cv2.INTER_LINEAR, borderMode=cv2.BORDER_CONSTANT, borderValue=(114, 114, 114))image_prep = (image_prep[..., ::-1] / 255.0).astype(np.float32)image_prep = image_prep.transpose(2, 0, 1)[None]return image_prep, M, IMdef nms(boxes, threshold=0.5):keep = []remove_flags = [False] * len(boxes)for i in range(len(boxes)):if remove_flags[i]:continueib = boxes[i]keep.append(ib)for j in range(len(boxes)):if remove_flags[j]:continuejb = boxes[j]# class mismatch or image_id mismatchif ib[6] != jb[6] or ib[5] != jb[5]:continuecleft,  ctop    = max(ib[:2], jb[:2])cright, cbottom = min(ib[2:4], jb[2:4])cross = max(0, cright - cleft) * max(0, cbottom - ctop)union = max(0, ib[2] - ib[0]) * max(0, ib[3] - ib[1]) + max(0, jb[2] - jb[0]) * max(0, jb[3] - jb[1]) - crossiou = cross / unionif iou >= threshold:remove_flags[j] = Truereturn keepdef post_process(pred, IM, threshold=0.25):# b, n, 85boxes = []for image_id, box_id in zip(*np.where(pred[..., 4] >= threshold)):item = pred[image_id, box_id]cx, cy, w, h, objness = item[:5]label = item[5:].argmax()confidence = item[5 + label] * objnessif confidence < threshold:continueboxes.append([cx - w * 0.5, cy - h * 0.5, cx + w * 0.5, cy + h * 0.5, confidence, image_id, label])boxes = np.array(boxes)lr = boxes[:, [0, 2]]tb = boxes[:, [1, 3]]boxes[:, [0, 2]] = lr * IM[0, 0] + IM[0, 2]boxes[:, [1, 3]] = tb * IM[1, 1] + IM[1, 2]# left, top, right, bottom, confidence, image_id, labelboxes = sorted(boxes.tolist(), key=lambda x:x[4], reverse=True)return nms(boxes)if __name__ == "__main__":session = onnxruntime.InferenceSession("workspace/yolov5s.onnx", providers=["CPUExecutionProvider"])image = cv2.imread("workspace/car.jpg")image_input, M, IM = preprocess(image)pred = session.run(["output"], {"images": image_input})[0]boxes = post_process(pred, IM)for obj in boxes:left, top, right, bottom = map(int, obj[:4])confidence = obj[4]label = int(obj[6])cv2.rectangle(image, (left, top), (right, bottom), (0, 255, 0), 2)cv2.putText(image, f"{label}: {confidence:.2f}", (left, top+20), 0, 1, (0, 0, 255), 2, 16)cv2.imwrite("workspace/python-ort.jpg", image)
我们简单分析下上述代码,首先我们在主函数中创建了一个 InferenceSession,把 onnx 路径塞进去,然后提供了一个 providers,在这里使用的是 CPU 后端
拿到 session 以后,读取图像并进行预处理,将预处理后的图像作为输入塞到 session.run 中拿到推理结果,
session.run 第一个参数是 output_names,是一个数组,意思是你想要哪几个节点作为输出,你就把对应节点名填入,第二个参数是 input 的 dict,如果你有多个输入,需要用一个 name + tensor 的方式对应,参数填写完成后交给 run 推理拿到一个 list,你指定了几个 output,它 return 的 list 中就有几个元素,由于我们只指定了一个 output,因此我们直接取 list 的第 0 项作为我们的 pred 的 tensor
有了这个 tensor 后,我们做了一个后处理将 tensor 恢复成框,变成框后绘制到图像上并存储下来,这个推理过程也就结束了
可以看到 onnxruntime 在 python 上你要使用它还是比较简单的,只需要创建 session 然后 run 就行,所以还是非常方便非常好用的,当你有一个模型想推理测试的时候你可以用 onnxruntime 来简单尝试一下
更多细节可参照 YOLOv5推理详解及预处理高性能实现
推理效果图如下:

2. C+±ort
我们接下来分析下 C++ 的程序,看看在 C++ 中的 onnxruntime 是怎么推理的
二话不说我们先去 make run 一下:

执行成功,它输出了 5 个框,推理图如下:
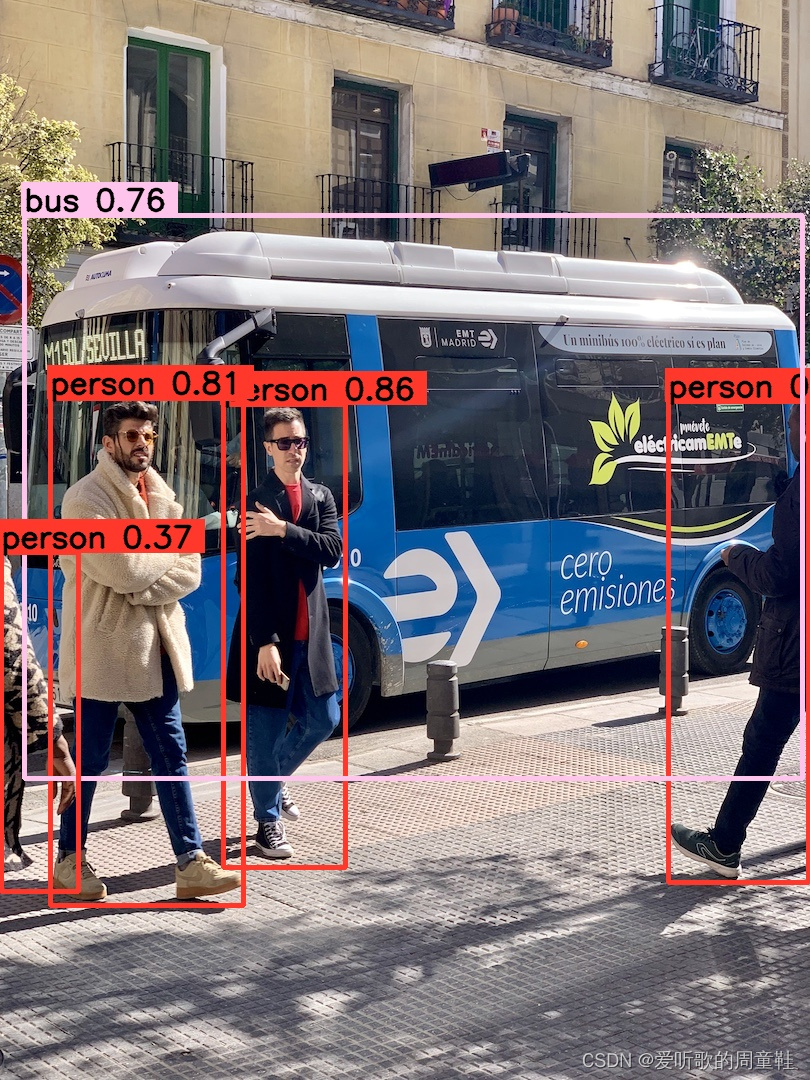
可以看到 C++ 的推理效果和 Python 的推理效果是一模一样的,因为预处理、框架、后处理都是一样的,那么推理的结果必定是相同的
我们来简单看下代码,完整的示例代码如下:
#include <onnxruntime_cxx_api.h>// system include
#include <stdio.h>
#include <math.h>#include <iostream>
#include <fstream>
#include <vector>
#include <memory>
#include <functional>
#include <unistd.h>#include <opencv2/opencv.hpp>
using namespace std;static const char* cocolabels[] = {"person", "bicycle", "car", "motorcycle", "airplane","bus", "train", "truck", "boat", "traffic light", "fire hydrant","stop sign", "parking meter", "bench", "bird", "cat", "dog", "horse","sheep", "cow", "elephant", "bear", "zebra", "giraffe", "backpack","umbrella", "handbag", "tie", "suitcase", "frisbee", "skis","snowboard", "sports ball", "kite", "baseball bat", "baseball glove","skateboard", "surfboard", "tennis racket", "bottle", "wine glass","cup", "fork", "knife", "spoon", "bowl", "banana", "apple", "sandwich","orange", "broccoli", "carrot", "hot dog", "pizza", "donut", "cake","chair", "couch", "potted plant", "bed", "dining table", "toilet", "tv","laptop", "mouse", "remote", "keyboard", "cell phone", "microwave","oven", "toaster", "sink", "refrigerator", "book", "clock", "vase","scissors", "teddy bear", "hair drier", "toothbrush"
};static std::tuple<uint8_t, uint8_t, uint8_t> hsv2bgr(float h, float s, float v){const int h_i = static_cast<int>(h * 6);const float f = h * 6 - h_i;const float p = v * (1 - s);const float q = v * (1 - f*s);const float t = v * (1 - (1 - f) * s);float r, g, b;switch (h_i) {case 0:r = v; g = t; b = p;break;case 1:r = q; g = v; b = p;break;case 2:r = p; g = v; b = t;break;case 3:r = p; g = q; b = v;break;case 4:r = t; g = p; b = v;break;case 5:r = v; g = p; b = q;break;default:r = 1; g = 1; b = 1;break;}return make_tuple(static_cast<uint8_t>(b * 255), static_cast<uint8_t>(g * 255), static_cast<uint8_t>(r * 255));
}static std::tuple<uint8_t, uint8_t, uint8_t> random_color(int id){float h_plane = ((((unsigned int)id << 2) ^ 0x937151) % 100) / 100.0f;;float s_plane = ((((unsigned int)id << 3) ^ 0x315793) % 100) / 100.0f;return hsv2bgr(h_plane, s_plane, 1);
}bool exists(const string& path){#ifdef _WIN32return ::PathFileExistsA(path.c_str());
#elsereturn access(path.c_str(), R_OK) == 0;
#endif
}vector<unsigned char> load_file(const string& file){ifstream in(file, ios::in | ios::binary);if (!in.is_open())return {};in.seekg(0, ios::end);size_t length = in.tellg();std::vector<uint8_t> data;if (length > 0){in.seekg(0, ios::beg);data.resize(length);in.read((char*)&data[0], length);}in.close();return data;
}void inference(){auto engine_data = load_file("yolov5s.onnx");Ort::Env env(ORT_LOGGING_LEVEL_INFO, "onnx");Ort::SessionOptions session_options;auto mem = Ort::MemoryInfo::CreateCpu(OrtArenaAllocator, OrtMemTypeDefault);session_options.SetIntraOpNumThreads(1);session_options.SetGraphOptimizationLevel(GraphOptimizationLevel::ORT_ENABLE_EXTENDED);Ort::Session session(env, "yolov5s.onnx", session_options);auto output_dims = session.GetOutputTypeInfo(0).GetTensorTypeAndShapeInfo().GetShape();const char *input_names[] = {"images"}, *output_names[] = {"output"};int input_batch = 1;int input_channel = 3;int input_height = 640;int input_width = 640;int64_t input_shape[] = {input_batch, input_channel, input_height, input_width};int input_numel = input_batch * input_channel * input_height * input_width;float* input_data_host = new float[input_numel];auto input_tensor = Ort::Value::CreateTensor(mem, input_data_host, input_numel, input_shape, 4);///// letter boxauto image = cv::imread("car.jpg");float scale_x = input_width / (float)image.cols;float scale_y = input_height / (float)image.rows;float scale = std::min(scale_x, scale_y);float i2d[6], d2i[6];i2d[0] = scale;  i2d[1] = 0;  i2d[2] = (-scale * image.cols + input_width + scale  - 1) * 0.5;i2d[3] = 0;  i2d[4] = scale;  i2d[5] = (-scale * image.rows + input_height + scale - 1) * 0.5;cv::Mat m2x3_i2d(2, 3, CV_32F, i2d);cv::Mat m2x3_d2i(2, 3, CV_32F, d2i);cv::invertAffineTransform(m2x3_i2d, m2x3_d2i);cv::Mat input_image(input_height, input_width, CV_8UC3);cv::warpAffine(image, input_image, m2x3_i2d, input_image.size(), cv::INTER_LINEAR, cv::BORDER_CONSTANT, cv::Scalar::all(114));cv::imwrite("input-image.jpg", input_image);int image_area = input_image.cols * input_image.rows;unsigned char* pimage = input_image.data;float* phost_b = input_data_host + image_area * 0;float* phost_g = input_data_host + image_area * 1;float* phost_r = input_data_host + image_area * 2;for(int i = 0; i < image_area; ++i, pimage += 3){// 注意这里的顺序rgb调换了*phost_r++ = pimage[0] / 255.0f;*phost_g++ = pimage[1] / 255.0f;*phost_b++ = pimage[2] / 255.0f;}///// 3x3输入,对应3x3输出int output_numbox = output_dims[1];int output_numprob = output_dims[2];int num_classes = output_numprob - 5;int output_numel = input_batch * output_numbox * output_numprob;float* output_data_host = new float[output_numel];int64_t output_shape[] = {input_batch, output_numbox, output_numprob};auto output_tensor = Ort::Value::CreateTensor(mem, output_data_host, output_numel, output_shape, 3);Ort::RunOptions options;session.Run(options, (const char* const*)input_names, &input_tensor, 1, (const char* const*)output_names, &output_tensor, 1);// decode boxvector<vector<float>> bboxes;float confidence_threshold = 0.25;float nms_threshold = 0.5;for(int i = 0; i < output_numbox; ++i){float* ptr = output_data_host + i * output_numprob;float objness = ptr[4];if(objness < confidence_threshold)continue;float* pclass = ptr + 5;int label     = std::max_element(pclass, pclass + num_classes) - pclass;float prob    = pclass[label];float confidence = prob * objness;if(confidence < confidence_threshold)continue;float cx     = ptr[0];float cy     = ptr[1];float width  = ptr[2];float height = ptr[3];float left   = cx - width * 0.5;float top    = cy - height * 0.5;float right  = cx + width * 0.5;float bottom = cy + height * 0.5;float image_base_left   = d2i[0] * left   + d2i[2];float image_base_right  = d2i[0] * right  + d2i[2];float image_base_top    = d2i[0] * top    + d2i[5];float image_base_bottom = d2i[0] * bottom + d2i[5];bboxes.push_back({image_base_left, image_base_top, image_base_right, image_base_bottom, (float)label, confidence});}printf("decoded bboxes.size = %d\n", bboxes.size());// nmsstd::sort(bboxes.begin(), bboxes.end(), [](vector<float>& a, vector<float>& b){return a[5] > b[5];});std::vector<bool> remove_flags(bboxes.size());std::vector<vector<float>> box_result;box_result.reserve(bboxes.size());auto iou = [](const vector<float>& a, const vector<float>& b){float cross_left   = std::max(a[0], b[0]);float cross_top    = std::max(a[1], b[1]);float cross_right  = std::min(a[2], b[2]);float cross_bottom = std::min(a[3], b[3]);float cross_area = std::max(0.0f, cross_right - cross_left) * std::max(0.0f, cross_bottom - cross_top);float union_area = std::max(0.0f, a[2] - a[0]) * std::max(0.0f, a[3] - a[1]) + std::max(0.0f, b[2] - b[0]) * std::max(0.0f, b[3] - b[1]) - cross_area;if(cross_area == 0 || union_area == 0) return 0.0f;return cross_area / union_area;};for(int i = 0; i < bboxes.size(); ++i){if(remove_flags[i]) continue;auto& ibox = bboxes[i];box_result.emplace_back(ibox);for(int j = i + 1; j < bboxes.size(); ++j){if(remove_flags[j]) continue;auto& jbox = bboxes[j];if(ibox[4] == jbox[4]){// class matchedif(iou(ibox, jbox) >= nms_threshold)remove_flags[j] = true;}}}printf("box_result.size = %d\n", box_result.size());for(int i = 0; i < box_result.size(); ++i){auto& ibox = box_result[i];float left = ibox[0];float top = ibox[1];float right = ibox[2];float bottom = ibox[3];int class_label = ibox[4];float confidence = ibox[5];cv::Scalar color;tie(color[0], color[1], color[2]) = random_color(class_label);cv::rectangle(image, cv::Point(left, top), cv::Point(right, bottom), color, 3);auto name      = cocolabels[class_label];auto caption   = cv::format("%s %.2f", name, confidence);int text_width = cv::getTextSize(caption, 0, 1, 2, nullptr).width + 10;cv::rectangle(image, cv::Point(left-3, top-33), cv::Point(left + text_width, top), color, -1);cv::putText(image, caption, cv::Point(left, top-5), 0, 1, cv::Scalar::all(0), 2, 16);}cv::imwrite("image-draw.jpg", image);delete[] input_data_host;delete[] output_data_host;
}int main(){inference();return 0;
}
可以看到它就是拿的 tensorRT 的 yolov5 的推理代码,只不过是把 tensorRT 给干掉了
在 inference 函数中首先定义了一个 Ort::Env 日志,然后定义了一个 Ort::SessionOptions 可设置一些参数,接着就是跟 Python 相同的步骤创建了一个 Ort::Session,通过 session 获取 output_dims,通过 Ort::Value::CreateTensor 创建输入图像的 tensor
下面就是和之前一样的图像预处理工作,接着创建一个 output_tensort 用于接收推理结果,然后调用 session.run 执行推理拿到预测结果,后面的内容就跟我们之前的完全一样,无非是 decode + nms + draw_bbox
所以 onnxruntime 在 python 和 c++ 上都是一个非常方便,非常简单的推理工具,大家可以去使用它,去挖掘它来解决我们平时工作中遇到的一些问题
总结
本次课程学习了 onnxruntime 推理,无论在 python 还是 c++ 上都比较简单,无非是创建一个 session,然后把输入数据塞进去,执行 session.run 推理即可拿到结果,如果我们平时想做一些简单的 onnx 推理验证时可以使用它