邢台企业做网站推广淘宝seo优化
跟着B站的视频敲了一个略微复杂的WPF界面,链接如下.在这里我详细的写一份博客进行设计总结.
系统介绍和配置及主窗口设计_哔哩哔哩_bilibili![]() https://www.bilibili.com/video/BV1Wy421Y7QD?p=1&vd_source=4796b18a2e4c1ec8a310391a5644b6da
https://www.bilibili.com/video/BV1Wy421Y7QD?p=1&vd_source=4796b18a2e4c1ec8a310391a5644b6da
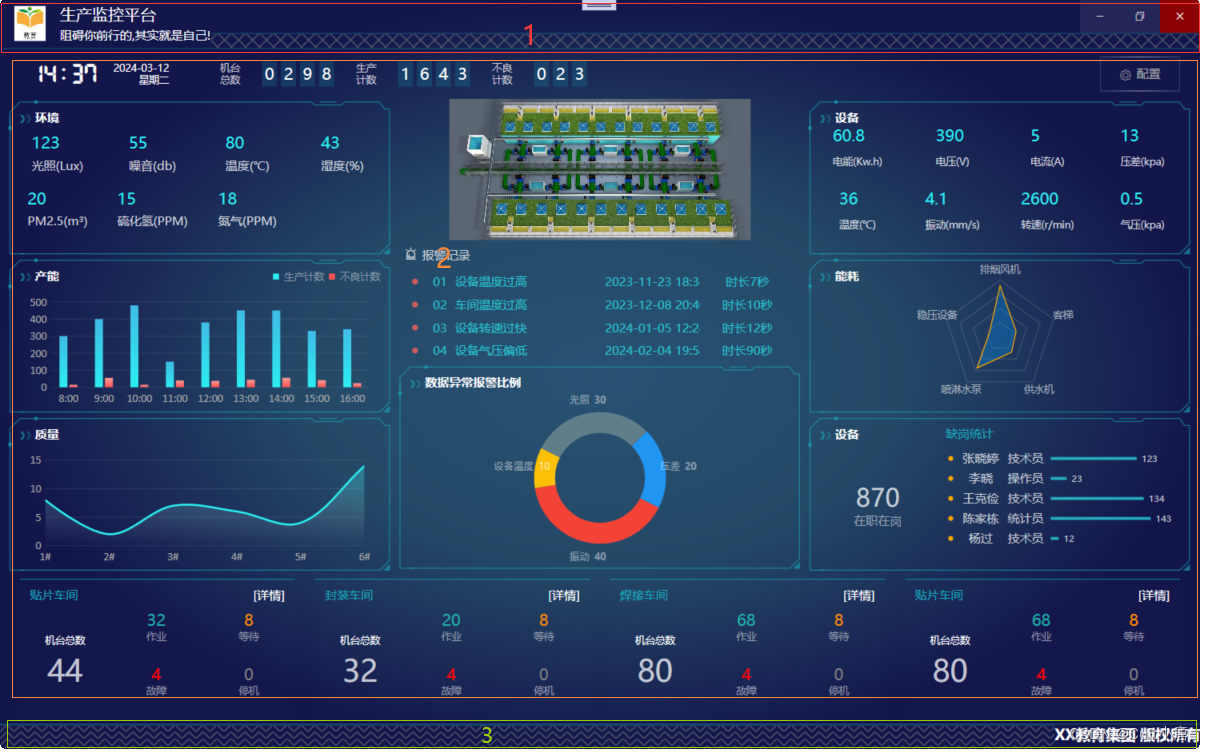
成果展示 
实现过程
总体来说,我的理解都是设计框架,再具体的画里面的布局.
界面整体背景设计
我们不需要窗口自带的边框,所以需要隐藏,这里调用设计WindowChrome中的GlassFrameThickness 为0或者负数即可.
<WindowChrome.WindowChrome><!--隐藏边框--><WindowChrome GlassFrameThickness="0"></WindowChrome></WindowChrome.WindowChrome> 界面整体颜色为渐变色,进行设计,渐变色使用画刷,这里介绍两种画刷,两种画刷的写法一致,只是颜色的方向有所差别,都是使用offset表示与开始点的距离
1.LinearGradientBrush,这种画刷是由左上角向右下.
2.RadialGradientBrush,这种画刷是有中心向外面渐变(此项目使用这种)
<!--设计背景颜色渐变--><Grid.Background><RadialGradientBrush><GradientStop Color="#ff285173" Offset="0"></GradientStop><GradientStop Color="#ff244967" Offset="0.5"></GradientStop><GradientStop Color="#13164B" Offset="1"></GradientStop></RadialGradientBrush></Grid.Background>运行结果:

首页设计
首页分为三行进行设计,标题为第一行,中间的内容为第二行,底部为第三行.
代码先分出三行:类似于代码中Height之类的属性,可以自己试着调,让界面看起来美观即可
<!--主界面分三行--><Grid.RowDefinitions><RowDefinition Height="50"></RowDefinition><RowDefinition Height="auto"></RowDefinition><RowDefinition Height="25"></RowDefinition></Grid.RowDefinitions>第一行:
第一行下面的分割线颜色设计为#5518aabd,整体分为3列,第三列再分为两行进行设计.

第一列最左边为一个图标,直接将文件中的Image拖入即可
<!--图标--><Image Source="/Res/Img/Logo.png" Margin="10,7" />第二列放置一个垂直吧方向的堆面板,再用TextBlock放置文字
<!--文字--><StackPanel Orientation="Vertical" Grid.Column="1"><TextBlock Text="生产监控平台" Foreground="White" FontSize="16" VerticalAlignment="Center" Margin="0,5,0,0"></TextBlock><TextBlock Text="阻碍你前行的,其实就是你自己!" Foreground="White" FontSize="12" Margin="0,3,0,0" ></TextBlock></StackPanel>第三列整体分为两行,第一行使用对面板放置三个按钮,第二行画纹路.,下面代码中的最小化和关闭按钮我与视频中的处理方法不一样,我这里是直接设计了一个点击事件,在此界面对应的代码中直接对窗口进行控制.
<!--右侧按钮和下面的图案--><Grid Grid.Column="2"><!--分为两行--><Grid.RowDefinitions><RowDefinition></RowDefinition><RowDefinition Height="15"></RowDefinition></Grid.RowDefinitions><!--三个图标--><!--WindowChrome.IsHitTestVisibleInChrome="True" 一定要加,否则自定义的不会显示--><StackPanel Orientation="Horizontal" HorizontalAlignment="Right" Background="Transparent" WindowChrome.IsHitTestVisibleInChrome="True"><Button Style="{StaticResource MinClose_BtnStyle}" Content="" Click="Button_Click_Min"></Button><Button Style="{StaticResource MinClose_BtnStyle}" Content=""></Button><Button Style="{StaticResource MinClose_BtnStyle}" Content="" Background="DarkRed" Click="Button_Click_Close"></Button></StackPanel><!--图案--><Border Grid.Row="1" BorderBrush="#5518aabd" BorderThickness="0,1,0,0" ><Border.Background><VisualBrush TileMode="FlipXY" Viewport="0,0,7,7" ViewportUnits="Absolute"><VisualBrush.Visual><Line X1="0" Y1="10" X2="10" Y2="0" Stroke="Gray" StrokeThickness="1"></Line></VisualBrush.Visual></VisualBrush></Border.Background></Border></Grid>其中,设计三个图标时引入了一个自定义的资源字典,因为不止这里会用到,故定义的全局变量.
<!--关闭\最小化按钮字典--><Style TargetType="Button" x:Key="MinClose_BtnStyle"><Setter Property="Width" Value="40"></Setter><Setter Property="Background" Value="#11ffffff"></Setter><Setter Property="Foreground" Value="White"></Setter><Setter Property="FontFamily" Value="../Res/Fonts/#iconfont"></Setter><!--模板--><Setter Property="Template"><Setter.Value><ControlTemplate TargetType="Button"><!--grid的背景就是按钮的背景--><Grid Background="{TemplateBinding Background}"><Border x:Name="border"><!--用于显示控件的内容--><ContentPresenter HorizontalAlignment="Center" VerticalAlignment="Center"></ContentPresenter></Border></Grid><!--触发器--><ControlTemplate.Triggers><Trigger Property="IsMouseOver" Value="True"><Setter TargetName="border" Property="Background" Value="#33ffffff"></Setter></Trigger></ControlTemplate.Triggers></ControlTemplate></Setter.Value></Setter></Style>这里字典中的FontFamily是再阿里巴巴资源图标库下载的后缀为.ttf的文件,content设置为里面的代码即可显示对应的图标
然后需要设计 WindowChrome.IsHitTestVisibleInChrome="True"
最后的图案是再boder中使用画笔画出
运行的结果

第三行
第三行是底部,比较简单和第一行类似,因此我们先进行设计.
底部分为两列,第一列绘制图案,第二列是相关文字
运行的结果
![]()
第二行
第二行内容很多,我们自定义一个用户控件放入.
首先要做的就是定义一个用户控件嵌入到主窗口之中,这里先新定义一个用户控件文件,再创建一个ViewModel层的文件,在里面将二者绑定起来
public event PropertyChangedEventHandler PropertyChanged;#region 中间那个 用户控件private UserControl _MonitorUC;public UserControl MonitorUC{get { if(_MonitorUC == null){_MonitorUC = new MonitorUC(); }return _MonitorUC;}set {_MonitorUC = value;if (PropertyChanged != null){PropertyChanged(this, new PropertyChangedEventArgs("MonitorUC"));}}}然后在主界面的 代码下实例化viewModel,设置数据上下文
//实例化MainWindowVM mainWindowVM = new MainWindowVM();public MainWindow(){InitializeComponent();//设置数据上下文this.DataContext = mainWindowVM;}最后主界面一定要嵌入此用户控件,嵌入使用ContentControl
<ContentControl Grid.Row="1" Content="{Binding MonitorUC}"></ContentControl>运行结果:

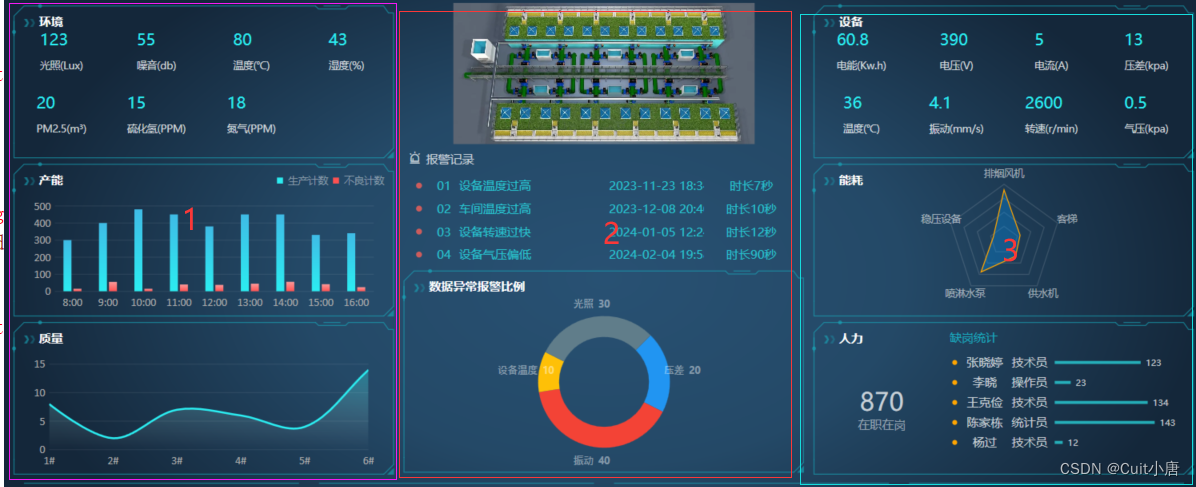
接着对第二行内部(自定义用户控件)进行设计,分为三行:

第二行内部的第一行分为两列,左边的日期为一列,右边剩下的为一列
左边第一列日期用一个水平方向的对面板里面放置一个TextBlock和一个垂直方向的堆面板,时间和日期视频里面是静态的,我这里进行动态获取,可参考这篇专栏里面的另一篇实时时间显示.
右边分为左右两部分,用靠左和靠右实现即可,左边使用水平方向的堆面板进行排列,文字换行使用WPF里面的换行符,中间有背景的字是再border里面嵌套了一个TextBlock,之后使用ItemsControl控件循环获取显示数据.
<!--资源--><StackPanel.Resources><!--动态数据模板--><DataTemplate x:Key="machineCount"><!--将当前数据项(通常是一个对象)的默认属性值绑定到 TextBlock 的 Text 属性上--><Border Width="15" Background="#3318aabd" Margin="2,0"><TextBlock Text="{Binding}" VerticalAlignment="Center" HorizontalAlignment="Center" Foreground="White" FontSize="16"></TextBlock></Border></DataTemplate></StackPanel.Resources>右边的按钮也是进行了一个资源编写.这里需要注意的是属性绑定,定义的目标对象是按钮,我们要放文字和一个图标进去,文字可以直接绑定按钮的Content属性,这里的图标绑定的是按钮的Tag属性,Tag在原按钮中什么也不代表,类似于官方预留的留给我们自定义的接口.
<Style TargetType="Button" x:Key="Setting_BtnStyle"><Setter Property="Foreground" Value="#aaa"></Setter><!--模板设置触发器\渐变色--><Setter Property="Template"><Setter.Value><ControlTemplate TargetType="Button"><Border Background="Transparent" BorderThickness="1" x:Name="border"><!--渐变色--><Border.BorderBrush><LinearGradientBrush StartPoint="0,0" EndPoint="1,0"><GradientStop Color="#22ffffff" Offset="0"></GradientStop><GradientStop Color="#77ffffff" Offset="0.5"></GradientStop><GradientStop Color="#22ffffff" Offset="1"></GradientStop></LinearGradientBrush></Border.BorderBrush><!--里面放置一个图标 一个文字 Tag类似自定义属性 Content就是对应按钮的Content--><StackPanel Orientation="Horizontal" HorizontalAlignment="Center" VerticalAlignment="Center"><TextBlock Text="{TemplateBinding Tag}" FontFamily="../Res/Fonts/#iconfont" Margin="0,2,5,0"></TextBlock><TextBlock Text="{TemplateBinding Content}" VerticalAlignment="Center"></TextBlock></StackPanel></Border><!--触发器 放入按钮变颜色--><ControlTemplate.Triggers><Trigger Property="IsMouseOver" Value="True"><Setter TargetName="border" Property="Background" Value="#11ffffff"></Setter></Trigger></ControlTemplate.Triggers></ControlTemplate></Setter.Value></Setter></Style>运行结果:

第二行的中间部分也是分为3列,三列里面每一列再分为三行,当然也已使用UniformGrid,因为每部分的大小一致
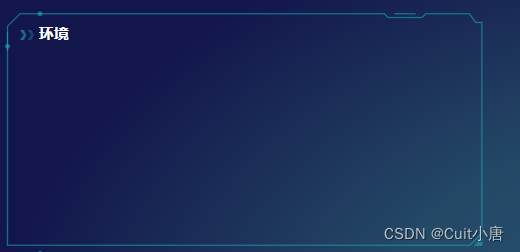
这里我们注意到GroupBox 几乎在每个部分都出现了,所以我们可以先把他画出来.
这里我们使用了Polyline画线,Ellipse画圆(点就是半径很小的圆),Path画路径,Polygon 画多边形. <ContentPresenter></ContentPresenter> 一定要加这句,才能显示重新定义的标题
<UserControl.Resources><Style TargetType="GroupBox"><Setter Property="Margin" Value="10,3"></Setter><Setter Property="Template"><Setter.Value><ControlTemplate TargetType="GroupBox"><Grid><!--左上角的线条--><Polyline Points="0 30,0 10,10 0,30 0" Stroke="#9918aabd" StrokeThickness="1" VerticalAlignment="Top" HorizontalAlignment="Left"></Polyline><!--左上 横的点 小圆--><Ellipse Width="4" Height="4" HorizontalAlignment="Left" Fill="#9918aabd" VerticalAlignment="Top" Margin="24,-2,0,0"></Ellipse><!--左侧的点 小圆--><Ellipse Width="4" Height="4" HorizontalAlignment="Left" Fill="#9918aabd" VerticalAlignment="Top" Margin="-2,24,0,0"></Ellipse><!--Moveto--><Path Data="M0 0,3 3,30 3,33 0,68 0,73 7,78 7,78,10M8 0,25 0" Stroke="#9918aabd" VerticalAlignment="Top" HorizontalAlignment="Right"></Path><!--左下角的线条--><Polyline Points="0 0,0 15,10 15" Stroke="#9918aabd" StrokeThickness="1" VerticalAlignment="Bottom" HorizontalAlignment="Left"></Polyline><!--右下角的线--><Polyline Points="10 0,0,10" Stroke="#9918aabd" StrokeThickness="1" HorizontalAlignment="Right" VerticalAlignment="Bottom"></Polyline><!--右下角的三角形--><Polygon Points="0 7,7 7,7 0" Fill="#9918aabd" HorizontalAlignment="Right" VerticalAlignment="Bottom"></Polygon><!--上面的线--><Border BorderThickness="0,1,0,0" BorderBrush="#9918aabd" VerticalAlignment="top" Margin="30,-0.5,78,0"></Border><!--右边的线--><Border BorderThickness="0,0,1,0" BorderBrush="#9918aabd" HorizontalAlignment="Right" Margin="0,10"></Border><!--下面的线--><Border BorderThickness="0,0,0,1" BorderBrush="#9918aabd" VerticalAlignment="Bottom" Margin="10,0"></Border><!--左边的线--><Border BorderThickness="1,0,0,0" BorderBrush="#9918aabd" HorizontalAlignment="Left" Margin="-0.5,15"></Border><!--文字前的装饰--><Path Data="M0 0,3 0,5 4,3 8,0 8,3 4" Fill="#9918aabd" Margin="10,13"></Path><Path Data="M0 0,3 0,5 4,3 8,0 8,3 4" Fill="#5518aabd" Margin="16,13"></Path><TextBlock Text="{TemplateBinding Header}" Foreground="White" FontWeight="Bold" Margin="25,8" HorizontalAlignment="Left" VerticalAlignment="Top"></TextBlock><!--显示内容--><ContentPresenter></ContentPresenter></Grid></ControlTemplate></Setter.Value></Setter></Style></UserControl.Resources>运行结果:
然后进行里面具体内容的绘制,这一部分要创建一个Nodels层来管理数据,里面绘制的柱状图等需要使用到LiveCharts的插件.

柱状图
<!--定义X数据--><lvc:CartesianChart Margin="20,35,20,5"><lvc:CartesianChart.AxisX><lvc:Axis Labels="8:00,9:00,10:00,11:00,12:00,13:00,14:00,15:00,16:00"><lvc:Axis.Separator><lvc:Separator Step="1" StrokeThickness="0"></lvc:Separator></lvc:Axis.Separator></lvc:Axis></lvc:CartesianChart.AxisX><!--定义Y的数据--><lvc:CartesianChart.Series><lvc:ColumnSeries Values="300,400,480,450,380,450,450,330,340" Title="生产计数" MaxColumnWidth="10"><!--渐变色--><lvc:ColumnSeries.Fill><LinearGradientBrush StartPoint="0,0" EndPoint="0,1"><GradientStop Color="#ff3fbbe6" Offset="0"></GradientStop><GradientStop Color="#ff2bedf1" Offset="1"></GradientStop></LinearGradientBrush></lvc:ColumnSeries.Fill></lvc:ColumnSeries><lvc:ColumnSeries Values="15,55,15,40,38,45,56,42,24" Title="不良计数" MaxColumnWidth="10"><!--渐变色--><lvc:ColumnSeries.Fill><LinearGradientBrush StartPoint="0,0" EndPoint="0,1"><GradientStop Color="#fffb9a9a" Offset="0"></GradientStop><GradientStop Color="#ffff5151" Offset="1"></GradientStop></LinearGradientBrush></lvc:ColumnSeries.Fill></lvc:ColumnSeries></lvc:CartesianChart.Series><!--Y数据刻度--><lvc:CartesianChart.AxisY><lvc:Axis MinValue="0" MaxValue="500" ><lvc:Axis.Separator><lvc:Separator Step="100" Stroke="#11ffffff"></lvc:Separator></lvc:Axis.Separator></lvc:Axis></lvc:CartesianChart.AxisY></lvc:CartesianChart>饼形图
<!--饼形图--><!--定义数据标签样式--><lvc:PieChart InnerRadius="45" Margin="0,40,0,20"><lvc:PieChart.Resources><Style TargetType="lvc:PieSeries"><Setter Property="DataLabelsTemplate"><Setter.Value><DataTemplate><StackPanel Orientation="Horizontal"><TextBlock Text="{Binding Point.SeriesView.Title}" Margin="0,0,5,0" Foreground="#44ffffff"></TextBlock><TextBlock Text="{Binding Point.SeriesView.Values[0]}" Foreground="#44ffffff"></TextBlock></StackPanel></DataTemplate></Setter.Value></Setter></Style></lvc:PieChart.Resources><!--定义饼形图数据--><lvc:PieChart.Series><lvc:PieSeries Values="20" Title="压差" StrokeThickness="0" DataLabels="True" LabelPosition="OutsideSlice"></lvc:PieSeries><lvc:PieSeries Values="40" Title="振动" StrokeThickness="0" DataLabels="True" LabelPosition="OutsideSlice"></lvc:PieSeries><lvc:PieSeries Values="10" Title="设备温度" StrokeThickness="0" DataLabels="True" LabelPosition="OutsideSlice"></lvc:PieSeries><lvc:PieSeries Values="30" Title="光照" StrokeThickness="0" DataLabels="True" LabelPosition="OutsideSlice"></lvc:PieSeries></lvc:PieChart.Series></lvc:PieChart>雷达:在界面中定义名字,在后台进行绘制
<!--画布--><Canvas x:Name="mainCanvas"></Canvas><!--4规则多边形--><Polygon x:Name="P1" Stroke="#22ffffff" StrokeThickness="1"></Polygon><Polygon x:Name="P2" Stroke="#22ffffff" StrokeThickness="1"></Polygon><Polygon x:Name="P3" Stroke="#22ffffff" StrokeThickness="1"></Polygon><Polygon x:Name="P4" Stroke="#22ffffff" StrokeThickness="1"></Polygon><!--数据多边形--><Polygon x:Name="P5" Stroke="Orange" Fill="#550091F0" StrokeThickness="1" ></Polygon> /// <summary>/// RaderUC.xaml 的交互逻辑/// </summary>public partial class RaderUC : UserControl{public RaderUC(){InitializeComponent();SizeChanged += OnSizeChanged;//Alt+Enter}/// <summary>/// 窗体大小发生变化 重新画图/// </summary>/// <param name="sender"></param>/// <param name="e"></param>private void OnSizeChanged(object sender, SizeChangedEventArgs e){Drag();}/// <summary>/// 数据源。支持数据绑定 依赖属性/// </summary>public List<RaderModel> ItemSource{get { return (List<RaderModel>)GetValue(ItemSourceProperty); }set { SetValue(ItemSourceProperty, value); }}// Using a DependencyProperty as the backing store for MyProperty. This enables animation, styling, binding, etc...public static readonly DependencyProperty ItemSourceProperty =DependencyProperty.Register("ItemSource", typeof(List<RaderModel>), typeof(RaderUC));/// <summary>/// 画图方法/// </summary>public void Drag(){//判断是否有数据if (ItemSource == null || ItemSource.Count == 0){return;}//清楚之前画的mainCanvas.Children.Clear();P1.Points.Clear();P2.Points.Clear();P3.Points.Clear();P4.Points.Clear();P5.Points.Clear();//调整大小(正方形)double size = Math.Min(RenderSize.Width, RenderSize.Height);LayGrid.Height = size;LayGrid.Width = size;//半径double raduis = size / 2;//步子跨度double step = 360.0 / ItemSource.Count;for (int i = 0; i < ItemSource.Count; i++){double x = (raduis - 20) * Math.Cos((step * i - 90) * Math.PI / 180);//x偏移量double y = (raduis - 20) * Math.Sin((step * i - 90) * Math.PI / 180);//y偏移量//X Y坐标P1.Points.Add(new Point(raduis + x, raduis + y));P2.Points.Add(new Point(raduis + x * 0.75, raduis + y * 0.75));P3.Points.Add(new Point(raduis + x * 0.5, raduis + y * 0.5));P4.Points.Add(new Point(raduis + x * 0.25, raduis + y * 0.25));//数据多边形P5.Points.Add(new Point(raduis + x * ItemSource[i].Value * 0.01, raduis + y * ItemSource[i].Value * 0.01));//文字处理TextBlock txt = new TextBlock();txt.Width = 60;txt.FontSize = 10;txt.TextAlignment = TextAlignment.Center;txt.Text = ItemSource[i].ItemName;txt.Foreground = new SolidColorBrush(Color.FromArgb(100, 255, 255, 255));txt.SetValue(Canvas.LeftProperty, raduis + (raduis - 10) * Math.Cos((step * i - 90) * Math.PI / 180) - 30);//设置左边间距txt.SetValue(Canvas.TopProperty, raduis + (raduis - 10) * Math.Sin((step * i - 90) * Math.PI / 180) - 7);//设置上边间距mainCanvas.Children.Add(txt);}}} 运行结果: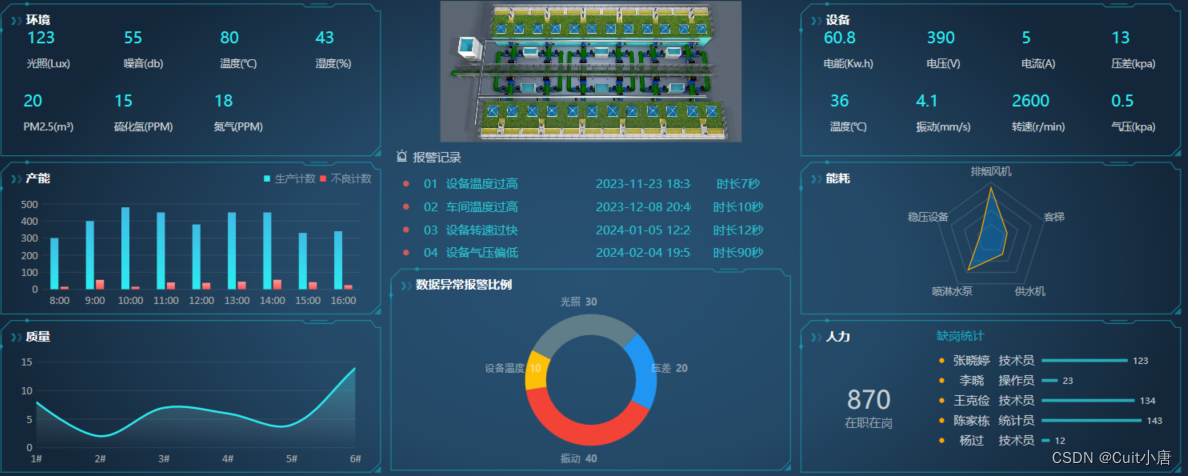
最后一个部分 整体分为两行两列设计,获取数据方法和上面类似;样式这些可以自己慢慢条.