dedecms网站地图 显示三级栏目代做网页设计平台
文章目录
- 一键部署项目
- Docker手动部署SpringBoot项目
- 编写docker部署的脚本文件
- script.sh 脚本内容
- 特别注意!
- 编写dockerfile
- dockerfile 文件内容
- 上传后端服务的jar包到服务器中
- 执行 script 脚本部署后端服务
- 自动部署SpringBoot项目
- 引入jsch依赖
- 编写jsch工具类
- 执行部署命令
- Docker手动部署Vue项目
- 编写docker部署的脚本文件
- script.sh 脚本内容
- 编写dockerfile
- dockerfile文件内容
- 编写nginx配置文件
- nginx配置文件内容
- 上传前端服务的打包文件到服务器
- 执行 script 脚本部署前端服务
- 访问 ip:9002 查看是否运行成功
- 自动部署Vue项目
- 工具类(慎重!包含服务器的删除操作!)
- main 函数
- 总结
一键部署项目
Git仓库地址!
我们每次部署项目都需要手动传输 jar 包,或者前端打包好的文件到服务器上,再连接服务器执行部署脚本,为了省去这个步骤,我们直接借助 jsch 包,来通过执行一个方法,就可以将打包好的文件上传至服务器,并且自动执行部署脚本。
Docker手动部署SpringBoot项目
编写docker部署的脚本文件
cd / # 进入根目录
mkdir develop/docker-deploy # 创建两级目录
cd develop/docker-deploy
vi script.sh # 编写部署脚本chmod +x ./script.sh # 授予脚本文件可执行的权限
script.sh 脚本内容
特别注意!
在 script.sh 脚本文件中,docker build 命令使用 -f 参数指定 dockerfile 文件的路径,并且指定docker镜像构建的上下文
-
dockerfile文件路径为/develop/docker-deploy/dockerfile -
指定 docker 镜像构建上下文目录为
/develop/docker-deploy/
那么在镜像构建的时候,就会把当前服务器的 /develop/docker-deploy/目录下的所有文件都发送给 docker 的守护进程。
在构建的时候会去执行 dockerfile 中的命令,在 dockerfile 中,ADD <src> <dest> 将 src 文件复制到容器的 dest 中,这里的 src 只能使用相对路径,相对的就是构建镜像的上下文,即 /develop/docker-deploy/ 目录。
我们后边使用 jsch 进行自动化部署时,由于 jsch 无法执行 cd 命令,不能切换路径,因此都需要通过绝对路径来指定docker的构建环境!
#!/bin/bash#构建docker镜像
echo "========================================正在构建镜像================================="
# -f 指定dockerfile文件  docker build最后边的参数不可以使用. 如果在其他目录执行该脚本文件
# 就会把执行脚本文件的目录当作构建镜像的上下文传送给docker的守护进程,那么在dockerfile中通过add添加的文件
# 都是以相对路径添加的,那么就会出现找不到文件的情况
docker build -t docker-deploy:01 -f /develop/docker-deploy/dockerfile /develop/docker-deploy/ # 停止并删除容器
echo "========================================正在删除容器================================="
docker stop docker-deploy
docker rm docker-deploy# 运行容器
echo "========================================正在创建新容器================================="
docker run --name docker-deploy -p 9001:9001 -d docker-deploy:01
编写dockerfile
cd develop/docker-deploy
vi dockerfile # 编写 dockerfile,如下
dockerfile 文件内容
#基础镜像
FROM openjdk:8-jdk-alpine
#作者
MAINTAINER abc
#执行命令,主要用来安装相关的软件
#RUN
# ADD将文件复制到镜像中
ADD Docker-Deploy-0.0.1-SNAPSHOT.jar /usr/local
RUN chmod u+x /usr/local/Docker-Deploy-0.0.1-SNAPSHOT.jar # 给当前目录下的test.py文件所有者添加执行权限
#挂载目录到容器
#VOLUME ["/data"]
#环境变量设置
#ENV #开放端口
EXPOSE 9001
#启动时执行的命令
CMD ["/bin/bash"]
#启动时执行的命令
ENTRYPOINT ["java","-jar","/usr/local/Docker-Deploy-0.0.1-SNAPSHOT.jar"]
上传后端服务的jar包到服务器中
最后目录如下:

执行 script 脚本部署后端服务
/develop/docker-deploy/script.sh # 测试绝对路径执行脚本
显示结果如下,表示执行成功
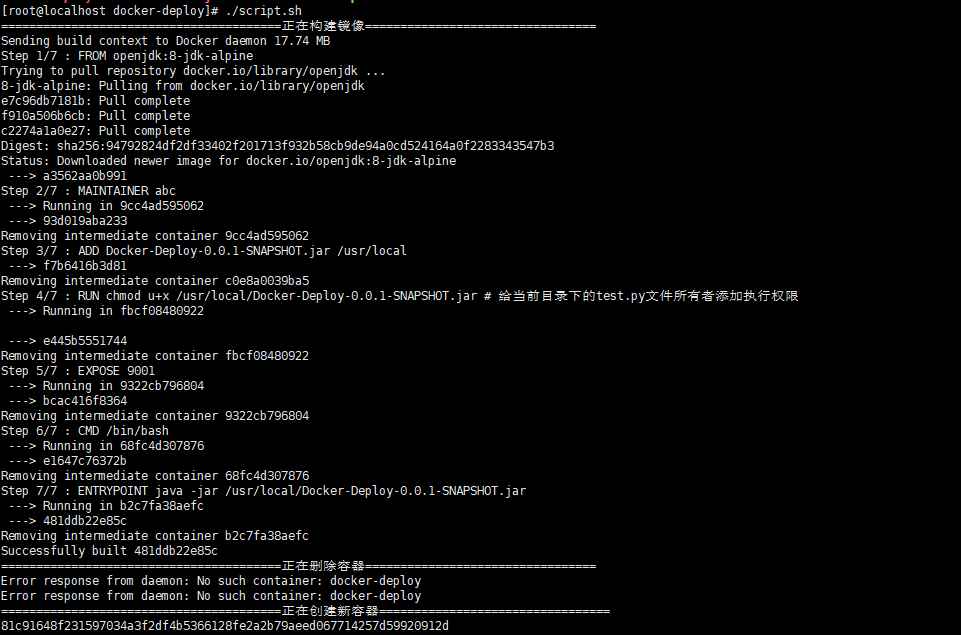
使用 docker ps 查看是否部署 docker 镜像成功

那么,手动部署没问题了,我们就可以通过 Java 的 jsch 包来实现不需要去服务器就可以进行部署项目。
自动部署SpringBoot项目
引入jsch依赖
<!--    jsch	-->
<dependency><groupId>com.jcraft</groupId><artifactId>jsch</artifactId><version>0.1.54</version>
</dependency>
编写jsch工具类
package com.example.jschquickdeploy.utils;import com.jcraft.jsch.*;
import org.slf4j.Logger;
import org.slf4j.LoggerFactory;import java.io.FileInputStream;
import java.io.FileNotFoundException;
import java.io.IOException;
import java.io.InputStream;
import java.util.Properties;/*** @author 千祎来了* @date 2023/8/7 15:08*/
public class ShellCommandExecution {private static final Logger logger = LoggerFactory.getLogger(ShellCommandExecution.class);public static Session getSession(String username, String password, String host, int port) {// 创建JSch对象JSch jSch = new JSch();Session jSchSession = null;try {// 根据主机账号、ip、端口获取一个Session对象jSchSession = jSch.getSession(username, host, port);// 存放主机密码jSchSession.setPassword(password);Properties config = new Properties();// 去掉首次连接确认config.put("StrictHostKeyChecking", "no");jSchSession.setConfig(config);// 超时连接时间为3秒jSchSession.setTimeout(3000);// 进行连接jSchSession.connect();} catch (Exception e) {logger.warn(e.getMessage());}return jSchSession;}/*** 下载文件,将 sourceFile 文件下载至 destinationFile* @param jSchSession* @param sourceFile* @param destinationFile* @throws Exception*/public static void downloadFiles(Session jSchSession, String sourceFile, String destinationFile) throws Exception {// Opening an SFTP ChannelChannelSftp chSftp = (ChannelSftp)jSchSession.openChannel("sftp");// Example Establish a connection to the SFTP channelchSftp.connect();// Set encoding formatchSftp.setFilenameEncoding("UTF-8");/*** 说明:* 1、当前上读取文件信息没有任何反馈,如果没有异常则代表成功* 2、如果需要判断是否读取成功的进度,可参考https://blog.csdn.net/coding99/article/details/52416373?locationNum=13&fps=1* 3、将src文件下载到dst路径中*/chSftp.get(sourceFile, destinationFile);logger.info("download file " + sourceFile + " success,location is:" + destinationFile);}/*** 将 sourceFile 上传至 destinationFile* @param jSchSession* @param sourceFile* @param destinationFile*/public static void uploadFiles(Session jSchSession, String sourceFile, String destinationFile) throws Exception{// Opening an SFTP ChannelChannelSftp chSftp = (ChannelSftp)jSchSession.openChannel("sftp");// Example Establish a connection to the SFTP channelchSftp.connect();// Set encoding formatchSftp.setFilenameEncoding("UTF-8");/*** 说明:* 1、当前上读取文件信息没有任何反馈,如果没有异常则代表成功* 2、如果需要判断是否读取成功的进度,可参考https://blog.csdn.net/coding99/article/details/52416373?locationNum=13&fps=1* 3、将src文件下载到dst路径中*/chSftp.put(sourceFile, destinationFile);logger.info("upload file " + sourceFile + " success,location is:" + destinationFile);}/*** 执行命令* @param command* @param jSchSession* @return* @throws Exception*/public static StringBuffer execCommand(String command, Session jSchSession) throws Exception{Channel exec = null;StringBuffer result = new StringBuffer();try {exec = jSchSession.openChannel("exec");((ChannelExec) exec).setCommand(command);exec.setInputStream(null);// 错误信息输出流,用于输出错误的信息,当exitstatus<0的时候((ChannelExec) exec).setErrStream(System.err);// 执行命令,等待结果exec.connect();// 获取命令执行结果InputStream in = exec.getInputStream();// 推出状态码int exitStatus = 0;/*** 通过channel获取信息的方式,采用官方Demo代码*/byte[] tmp = new byte[1024];while (true) {while (in.available() > 0) {int i = in.read(tmp, 0, 1024);if (i < 0) {break;}result.append(new String(tmp, 0, i));}// 从channel获取全部信息之后,channel会自动关闭if (exec.isClosed()) {if (in.available() > 0) {continue;}exitStatus = exec.getExitStatus();break;}try {Thread.sleep(1000);} catch (Exception ee) {}}logger.info("命令:【" + command + "】的执行结果为:" + result);// 如果状态码不是0,则表示执行失败if (exitStatus != 0) {logger.error("状态码为:" + exitStatus + ",命令执行失败:" + result);throw new Exception("命令:【" + command + "】执行失败,执行结果为:" + result);}} finally {// 关闭 jschChannel 流if (exec != null && exec.isConnected()) {exec.disconnect();}}return result;}
}
执行部署命令
在 main 方法中,只需要做2件事就可以一键部署了:
- 将我们使用 maven 工具打包好的 jar 包的路径上传到服务器指定目录
- 调用服务器上的执行脚本即可
注意:这里执行需要使用绝对路径,在 jsch 中无法使用 cd 命令
package com.example.jschquickdeploy.utils;import com.jcraft.jsch.JSch;
import com.jcraft.jsch.Session;
import org.slf4j.Logger;
import org.slf4j.LoggerFactory;import java.util.Properties;/*** @author 千祎来了* @date 2023/8/9 21:43*/
public class QuickDeploy {private static final Logger logger = LoggerFactory.getLogger(ShellCommandExecution.class);public static void main(String[] args) {/*** 连接服务器*/String username = "root";String password = "123456";String host = "127.0.0.1";int port = 2222;Session jSchSession = null;try {jSchSession = ShellCommandExecution.getSession(username, password, host, port);/*** 上传 jar 包到服务器*/ShellCommandExecution.uploadFiles(jSchSession, "D:\\Project\\IDEA\\Docker-Deploy\\target\\Docker-Deploy-0.0.1-SNAPSHOT.jar", "/develop/docker-deploy");/*** 执行部署命令*/ShellCommandExecution.execCommand("/develop/docker-deploy/script.sh", jSchSession);/*** 查看镜像*/ShellCommandExecution.execCommand("docker ps", jSchSession);} catch (Exception e) {logger.warn(e.getMessage());} finally {// close jschSesson streamif (jSchSession != null && jSchSession.isConnected()) {jSchSession.disconnect();}}}
}
Docker手动部署Vue项目
编写docker部署的脚本文件
cd /develop # 进到部署对应目录
mkdir docker-deploy-front # 创建前端部署目录
cd docker-deploy-front
vi script.sh # 编写部署脚本
chmod +x ./script.sh # 授予脚本执行权限
script.sh 脚本内容
#!/bin/bashecho "========================================正在构建镜像================================="
docker build -t docker-deploy-front:1.0 -f /develop/docker-deploy-front/dockerfile /develop/docker-deploy-front/# 停止并删除容器
echo "========================================正在删除容器================================="
docker stop docker-deploy-front
docker rm docker-deploy-front# 运行容器
echo "========================================正在创建新容器================================="
docker run --name docker-deploy-front -d -p 9002:80  docker-deploy-front:1.0
~
编写dockerfile
vi dockerfile
dockerfile文件内容
# 设置基础镜像,这里使用最新的nginx镜像,前面已经拉取过了
FROM nginx
#作者
MAINTAINER abc
#执行命令,主要用来安装相关的软件
RUN rm /etc/nginx/conf.d/default.conf
# 将 nginx 配置文件复制到镜像中
ADD default.conf /etc/nginx/conf.d/ #添加文件
#将dist文件中的内容复制到 /usr/share/nginx/html/ 这个目录下面
#容器内nginx默认的html文件目录为 /usr/share/nginx/html/
COPY dist/  /usr/share/nginx/html/
编写nginx配置文件
vi default.conf
nginx配置文件内容
server {listen       80;listen  [::]:80;server_name  localhost;location / {root   /usr/share/nginx/html;index  index.html index.htm;try_files $uri $uri/ /index.html;}error_page   500 502 503 504  /50x.html;location = /50x.html {root   /usr/share/nginx/html;}
}
上传前端服务的打包文件到服务器
进入 vue 项目根目录,调用 npm run build 打包前端项目,生成 dist 文件夹
最后,前端需要的所有文件如下:

执行 script 脚本部署前端服务
执行 ./script 即可
/develop/docker-deploy-front/script # 执行脚本
docker ps # 查看docker容器是否启动成功
访问 ip:9002 查看是否运行成功
http://localhost:9002/ (我这里是本地,服务器要加上服务器ip)

自动部署Vue项目
这里使用的项目和自动部署后端项目使用的是同一个项目,因此依赖和工具类不需要重新引入
由于自动部署后端代码时,上传的只有一个 jar 包,因此上传功能比较好些,但是 vue 项目打包生成的是 dist 目录,因此需要给工具类添加上传目录的方法,如下:
工具类(慎重!包含服务器的删除操作!)
拿到工具类之后,不要立即执行在,将路径换为自己服务器上的路径再执行!以免误删文件!
在 uploadDir 方法中有一个删除操作,删除的是服务器上已经存在的打包的目录,也就是服务器上的 dist 文件夹所在目录!
相较于后端部署时,多添加了一个 uploadDir 方法,用于上传一整个目录
该方法中使用递归去遍历文件,因为 jsch 中并没有直接上传目录的操作,因此需要我们自己去遍历目录,并上传每一个文件
package com.example.jschquickdeploy.utils;import com.jcraft.jsch.*;
import org.slf4j.Logger;
import org.slf4j.LoggerFactory;import java.io.*;
import java.nio.file.Files;
import java.nio.file.Path;
import java.nio.file.Paths;
import java.util.Objects;
import java.util.Properties;/*** @author 千祎来了* @date 2023/8/7 15:08*/
public class ShellCommandExecution {private static final Logger logger = LoggerFactory.getLogger(ShellCommandExecution.class);private static Session jSchSession = null;public static Session getSession(String username, String password, String host, int port) {// 创建JSch对象JSch jSch = new JSch();Session jSchSession = null;try {// 根据主机账号、ip、端口获取一个Session对象jSchSession = jSch.getSession(username, host, port);// 存放主机密码jSchSession.setPassword(password);Properties config = new Properties();// 去掉首次连接确认config.put("StrictHostKeyChecking", "no");jSchSession.setConfig(config);// 超时连接时间为3秒jSchSession.setTimeout(3000);// 进行连接jSchSession.connect();ShellCommandExecution.jSchSession = jSchSession;} catch (Exception e) {logger.warn(e.getMessage());}return jSchSession;}/*** 下载文件,将 sourceFile 文件下载至 destinationFile* @param sourceFile* @param destinationFile* @throws Exception*/public static void downloadFiles(String sourceFile, String destinationFile) throws Exception {// Opening an SFTP ChannelChannelSftp chSftp = (ChannelSftp)jSchSession.openChannel("sftp");// Example Establish a connection to the SFTP channelchSftp.connect();// Set encoding formatchSftp.setFilenameEncoding("UTF-8");/*** 说明:* 1、当前上读取文件信息没有任何反馈,如果没有异常则代表成功* 2、如果需要判断是否读取成功的进度,可参考https://blog.csdn.net/coding99/article/details/52416373?locationNum=13&fps=1* 3、将src文件下载到dst路径中*/chSftp.get(sourceFile, destinationFile);logger.info("download file " + sourceFile + " success,location is:" + destinationFile);}/*** 将 sourceDir 目录下的所有文件上传至 destinationDir 目录下* 假设 sourceDir = "D:\Project\IDEA\Docker-Quick-Deploy\docker-deploy-front\dist"* destinationDir = "/develop/docker-deploy-front"* 那么该方法将 dist 目录所有文件都传输至 /develop/docker-deploy-front/dist 目录中* @param sourceDir* @param destinationDir* @throws Exception*/public static void uploadDir(String sourceDir, String destinationDir) throws Exception{// Opening an SFTP ChannelChannelSftp chSftp = (ChannelSftp)jSchSession.openChannel("sftp");// Example Establish a connection to the SFTP channelchSftp.connect();// Set encoding formatchSftp.setFilenameEncoding("UTF-8");// 文件夹名称String dirName = sourceDir.substring(sourceDir.lastIndexOf("\\") + 1);String linuxRootDir =  destinationDir + "/" + dirName;String windowsRootDir =  sourceDir;execCommand("rm -rf " +  linuxRootDir);logger.info("删除文件夹" + linuxRootDir);execCommand("mkdir " +  linuxRootDir);logger.info("创建文件夹" + linuxRootDir);/*** 将 sourceDir 目录下的文件传输至 targetDir*/transFile(chSftp, sourceDir, windowsRootDir, linuxRootDir);}/*** 递归传输文件** @param chSftp* @param sourceDir* @param windowsRootDir* @param linuxRootDir* @throws IOException* @throws SftpException*/private static void transFile(ChannelSftp chSftp, String sourceDir, String windowsRootDir, String linuxRootDir) throws Exception {File root = new File(sourceDir);for (File file : Objects.requireNonNull(root.listFiles())) {if (file.isFile()) {Path src = Paths.get(file.getPath());String des = file.getPath().replace(windowsRootDir, linuxRootDir).replace("\\", "/");file.getPath().replace(windowsRootDir, "");logger.info("上传源文件:" + src.toString() + "到目的文件:" + des);chSftp.put(Files.newInputStream(src), des);} else if (file.isDirectory()) {String dirName = file.getPath().replace(windowsRootDir, linuxRootDir).replace("\\", "/");execCommand("mkdir " + dirName);logger.info("创建文件夹:" + dirName);transFile(chSftp, file.getPath(), windowsRootDir, linuxRootDir);}}}/*** 将 sourceFile 上传至 destinationFile* @param sourceFile 必须为文件* @param destinationFile*/public static void uploadFiles(String sourceFile, String destinationFile) throws Exception{ChannelSftp chSftp = null;try {// Opening an SFTP ChannelchSftp = (ChannelSftp)jSchSession.openChannel("sftp");// Example Establish a connection to the SFTP channelchSftp.connect();// Set encoding formatchSftp.setFilenameEncoding("UTF-8");/*** 说明:* 1、当前上读取文件信息没有任何反馈,如果没有异常则代表成功* 2、如果需要判断是否读取成功的进度,可参考https://blog.csdn.net/coding99/article/details/52416373?locationNum=13&fps=1* 3、将src文件下载到dst路径中*/chSftp.put(sourceFile, destinationFile, ChannelSftp.OVERWRITE);logger.info("upload file " + sourceFile + " success,location is:" + destinationFile);} finally {// 关闭 jschChannel 流if (chSftp != null && chSftp.isConnected()) {chSftp.disconnect();}}}/*** 执行命令* @param command* @return* @throws Exception*/public static StringBuffer execCommand(String command) throws Exception{Channel exec = null;StringBuffer result = new StringBuffer();try {exec = jSchSession.openChannel("exec");((ChannelExec) exec).setCommand(command);exec.setInputStream(null);// 错误信息输出流,用于输出错误的信息,当exitstatus<0的时候((ChannelExec) exec).setErrStream(System.err);// 执行命令,等待结果exec.connect();// 获取命令执行结果InputStream in = exec.getInputStream();// 推出状态码int exitStatus = 0;/*** 通过channel获取信息的方式,采用官方Demo代码*/byte[] tmp = new byte[1024];while (true) {while (in.available() > 0) {int i = in.read(tmp, 0, 1024);if (i < 0) {break;}result.append(new String(tmp, 0, i));}// 从channel获取全部信息之后,channel会自动关闭if (exec.isClosed()) {if (in.available() > 0) {continue;}exitStatus = exec.getExitStatus();break;}try {Thread.sleep(1000);} catch (Exception ee) {}}logger.info("命令:【" + command + "】的执行结果为:" + result);// 如果状态码不是0,则表示执行失败if (exitStatus != 0) {logger.error("状态码为:" + exitStatus + ",命令执行失败:" + result);throw new Exception("命令:【" + command + "】执行失败,执行结果为:" + result);}} finally {// 关闭 jschChannel 流if (exec != null && exec.isConnected()) {exec.disconnect();}}return result;}
}
main 函数
package com.example.jschquickdeploy.utils;import com.jcraft.jsch.Session;
import org.slf4j.Logger;
import org.slf4j.LoggerFactory;/*** @author 千祎来了* @date 2023/8/10 9:51*/
public class QuickDeployFront {private static final Logger logger = LoggerFactory.getLogger(ShellCommandExecution.class);public static void main(String[] args) {/*** 连接服务器*/String username = "root";String password = "123456";String host = "127.0.0.1";int port = 2222;Session jSchSession = null;try {jSchSession = ShellCommandExecution.getSession(username, password, host, port);/*** 上传 Vue 打包文件到服务器*/ShellCommandExecution.uploadDir(jSchSession, "D:\\Project\\IDEA\\Docker-Quick-Deploy\\docker-deploy-front\\dist", "/develop/docker-deploy-front");/*** 执行部署命令*/ShellCommandExecution.execCommand("/develop/docker-deploy-front/script.sh", jSchSession);/*** 查看镜像*/ShellCommandExecution.execCommand("docker ps", jSchSession);} catch (Exception e) {logger.warn(e.getMessage());} finally {// close jschSesson streamif (jSchSession != null && jSchSession.isConnected()) {jSchSession.disconnect();}}}
}
总结
这样一键部署项目就完成了,部署步骤如下:
后端部署:
- 对 springboot 项目打成 jar 包
- 在方法中指定 jar 包位置和上传服务器位置
- 在方法中指定部署脚本
script执行命令 - 执行 main 方法
前端部署:
- 对 vue 项目打包
- 在方法中指定 dist 文件夹位置和上传服务器位置
- 在方法中指定部署脚本
script执行命令 - 执行 main 方法