电子商务网站建设策划方案全网营销骗局揭秘
虽然目前市场上多数的开发模式采用前后端分离的技术,视图层的技术在小一些的项目中还是非常有用的,所以一直也占有一席之地,如spring官方的spring.io等网站就是使用视图层技术实现的。
目前Spring Boot支持的较好的两个视图层模板引擎是Thymeleaf和FreeMarker,其中Thymeleaf是默认的模板引擎。
一、整合Thymeleaf
Thymeleaf支持HTML原型,可以直接在浏览器中查看页面样式,这对于调试是非常方便的,SpringBoot工程整合Thymeleaf只需要几个简单的步骤:
- 添加依赖
<dependency><groupId>org.springframework.boot</groupId><artifactId>spring-boot-starter-web</artifactId></dependency><dependency><groupId>org.springframework.boot</groupId><artifactId>spring-boot-starter-thymeleaf</artifactId></dependency> - 配置Thymeleaf
Springboot中Thymeleaf默认的配置类为:ThymeleafAutoConfiguration,默认的模板以html格式存在于classpath:/templates目录下,如果要改变这些配置,可以在application.properties中修改,所有的配置以spring.thymeleaf为前缀:#是否启用thymeleaf,默认true spring.thymeleaf.enabled=true #是否开启缓存,默认true spring.thymeleaf.cache=true #检查模板是否存在,默认为true spring.thymeleaf.check-template=true #检查模板位置是否存在,默认为true spring.thymeleaf.check-template-location=true #开启EL编译器,默认为true spring.thymeleaf.enable-spring-el-compiler=true #配置模版的位置 spring.thymeleaf.prefix=classpath:/templates/ #配置模板的编码 spring.thymeleaf.encoding=UTF-8 #配置模版支持的类型,默认为HTML spring.thymeleaf.mode=HTML #配置模板文件的后缀,默认为.html spring.thymeleaf.suffix=.html #配置content-type spring.thymeleaf.servlet.content-type=text/html
3.配置ModelAndView
编写controller,返回一个ModelAndView,返回到页面上渲染的数据存储在ModelAndView中。
@Controller
@RequestMapping("/thymeleaf")
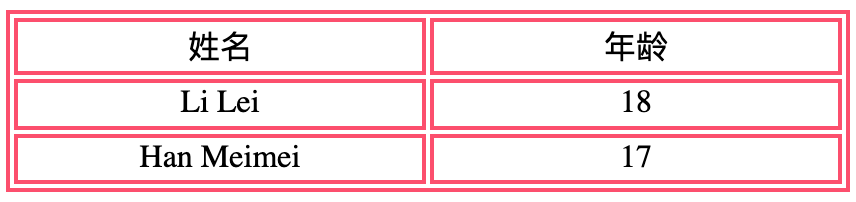
public class ThymeleafController {private class Student{private String name;private int age;public String getName() {return name;}public void setName(String name) {this.name = name;}public int getAge() {return age;}public void setAge(int age) {this.age = age;}}@GetMapping("/students")public ModelAndView students(){List<Student> students = new ArrayList<>();Student student1 = new Student();student1.setName("Li Lei");student1.setAge(18);Student student2 = new Student();student2.setName("Han Meimei");student2.setAge(17);students.add(student1);students.add(student2);ModelAndView modelAndView = new ModelAndView();modelAndView.addObject("students",students);modelAndView.setViewName("test");return modelAndView;}
}4.编写template
在resources目录下创建templates文件,创建test.html,对应上面代码的viewName,填入以下内容:
<!DOCTYPE html>
<html lang="en" xmlns:th="http://www.thymeleaf.org">
<head><meta charset="UTF-8"><title>Thymeleaf Testing</title>
</head>
<style>tr,td,th {border: 2px solid #ff4c6b;width: 200px;}
</style>
<body style="text-align:center;">
<table style="margin:200px auto;border: 2px solid #ff4c6b;"><tr><td>姓名</td><td>年龄</td></tr><tr th:each="student:${students}"><td th:text="${student.name}"></td><td th:text="${student.age}"></td></tr>
</table>
</body>
</html>访问localhost:8080/thymeleaf/students得到以下页面:
二、整合FreeMarker
整合FreeMarker于Thymeleaf非常相似,springboot提供了一致的整合方案,所以你只需要将以上的步骤做一下修改:
1、添加依赖
将Thymeleaf依赖替换成FreeMarker依赖
<dependency><groupId>org.springframework.boot</groupId><artifactId>spring-boot-starter-freemarker</artifactId></dependency>2、修改模板
将原来建立的html模板改成.ftl模板,其余不变。