企业网站优化定制沧州网站运营公司
这里写目录标题
- 说明
- 一、新建项目
- 二、创建适配器
- 三、创建服务器和客户端
- 3.1 服务器
- 3.2 客户端
- 3.3 客户端发送
- 3.4 客户端接收
- 3.5 服务器接收与发送
- 四、关于同步Send
说明
今天有小伙伴咨询我,他和同事(c++端)协商了一个协议,如果使用TouchSocket应该如何解析呢。协议大致如下。
我一看,这个协议还是比较复杂的,因为里面有package len、command len、data len三个部分是不固定的。
而且是不对称协议。即:请求包格式和响应包格式是不一样的(响应包多了一个Code)。
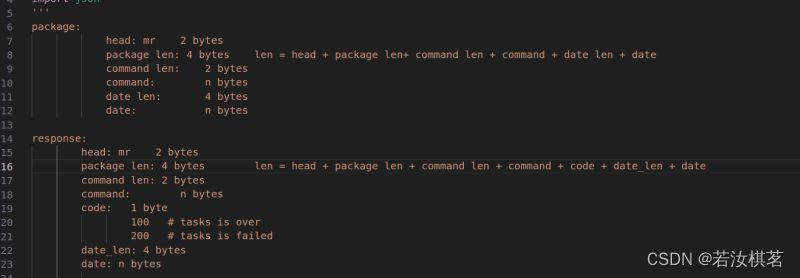
首先先解释一下数据格式。
- head:两个字节,固定为“mr”。
- package len:4字节,int32大端有符号类型。值等于head+package len+command len+command+(code)+data len+data。即所有数据长度。
- command len:2字节,uint16大端无符号类型,标识command长度
- command:不固定长度
- code:仅响应时包含,一个字节
- data len:4字节,int32大端有符号类型。标识data长度
- data:不固定长度
看得人头皮发麻,不过虽然难。但是也属于固定包头的范畴。
因为如果我们把head和package len看成一个固定包头的话,固定头就是6。那command len、command、(code)、data len、data就相当于Body,body长度就是package len-6。然后可以再解析command len,command,data len data等。那么就可以使用模板解析“固定包头”数据适配器。
一、新建项目
首先,新建一个控制台项目。使用net6.0。然后nuget安装TouchSocket。此操作不会的小伙伴可以看看入门 TouchSocket入门和VS、Unity安装和使用Nuget包
二、创建适配器
在TouchSocket中,适配器就是负责对数据编解码的。具体可以看数据处理适配器。
首先新建一个类,名为MyBase。用于存放请求和响应的共同成员。结构大致如下:
class MyBase
{/// <summary>/// header固定为mr/// </summary>public string Header => "mr";public ushort CommandLen { get; protected set; }public byte[] Command { get; protected set; }public int DataLen { get; protected set; }public byte[] Data { get; protected set; }public void SetCommand(byte[] command){this.Command = command;this.CommandLen = (ushort)(command == null ? 0 : command.Length);}public void SetData(byte[] data){this.Data = data;this.DataLen = data == null ? 0 : data.Length;}
}
因为此协议是不对称协议,对于客户端,它需要发送Request,然后能解析Response。
对于服务器,它需要接受(解析)Request,响应(发送)Response。
那么我们先来写客户端适配器。
首先再新建一个类,名为MyResponsePackage。然后继承MyBase,同时实现IFixedHeaderRequestInfo。
操作原理可以看模板解析“固定包头”数据适配器
class MyResponsePackage : MyBase, IFixedHeaderRequestInfo
{public byte Code { get; private set; }private int m_length;public void SetCode(byte code){this.Code = code;}int IFixedHeaderRequestInfo.BodyLength => this.m_length;bool IFixedHeaderRequestInfo.OnParsingBody(byte[] body){try{//下标索引int index = 0;this.CommandLen = TouchSocketBitConverter.BigEndian.ToUInt16(body, index);index += 2;this.Command = body.Skip(index).Take(this.CommandLen).ToArray();index += this.CommandLen;this.Code = body[index];index += 1;this.DataLen = TouchSocketBitConverter.BigEndian.ToInt32(body, index);index += 4;this.Data = body.Skip(index).Take(this.DataLen).ToArray();index += this.DataLen;return true;}catch (Exception ex){return false;}}bool IFixedHeaderRequestInfo.OnParsingHeader(byte[] header){var headerStr = Encoding.ASCII.GetString(header, 0, 2);if (this.Header.Equals(headerStr)){this.m_length = TouchSocketBitConverter.BigEndian.ToInt32(header, 2) - 6;return true;}return false;}
}
然后再新建一个类,名为MyClientAdapter,继承CustomFixedHeaderDataHandlingAdapter,同时指定MyResponsePackage为泛型成员。
/// <summary>
/// 此适配器仅用于客户端。解析收到的<see cref="MyResponsePackage"/>
/// </summary>
internal class MyClientAdapter : CustomFixedHeaderDataHandlingAdapter<MyResponsePackage>
{public override int HeaderLength => 6;protected override MyResponsePackage GetInstance(){return new MyResponsePackage();}
}
至此,客户端的适配器解析就完成了。
现在我们来写服务器端适配器。
首先新建一个类,名为MyRequestPackage,同样继承MyBase,然后实现IFixedHeaderRequestInfo。
class MyRequestPackage : MyBase, IFixedHeaderRequestInfo
{private int m_length;int IFixedHeaderRequestInfo.BodyLength => this.m_length;bool IFixedHeaderRequestInfo.OnParsingBody(byte[] body){try{//下标索引int index = 0;this.CommandLen = TouchSocketBitConverter.BigEndian.ToUInt16(body, index);index += 2;this.Command = body.Skip(index).Take(this.CommandLen).ToArray();index += this.CommandLen;this.DataLen = TouchSocketBitConverter.BigEndian.ToInt32(body, index);index += 4;this.Data = body.Skip(index).Take(this.DataLen).ToArray();index += this.DataLen;return true;}catch (Exception ex){return false;}}bool IFixedHeaderRequestInfo.OnParsingHeader(byte[] header){var headerStr = Encoding.ASCII.GetString(header, 0, 2);if (this.Header.Equals(headerStr)){this.m_length = TouchSocketBitConverter.BigEndian.ToInt32(header, 2) - 6;return true;}return false;}
}
然后新建一个类,名为MyServerAdapter。同样继承CustomFixedHeaderDataHandlingAdapter,指定MyRequestPackage为泛型成员。
/// <summary>
/// 此适配器仅用于服务器。主要功能是解析收到的<see cref="MyRequestPackage"/>
/// </summary>
internal class MyServerAdapter : CustomFixedHeaderDataHandlingAdapter<MyRequestPackage>
{public override int HeaderLength => 6;protected override MyRequestPackage GetInstance(){return new MyRequestPackage();}
}
至此。服务器适配器就写好了。
如果你的工作只是其中的一部分。那么你可以直接交差了。但是对我们来说还差点东西。
比如,对于客户端。我们应该怎么发送数据呢?按字节发送吗?那就太low了。
我们当然是要封装成对象来发送才比较好操作。
那么,让我们来改造一下MyRequestPackage。
首先,我们需要让MyRequestPackage再实现一个IRequestInfoBuilder的接口。该接口大概如下,其中Build方法,会指示成员应当如何构建数据。
/// <summary>
/// 指示<see cref="IRequestInfo"/>应当如何构建
/// </summary>
public interface IRequestInfoBuilder
{/// <summary>/// 构建数据时,指示内存池的申请长度。/// </summary>int MaxLength { get;}/// <summary>/// 构建对象到<see cref="ByteBlock"/>/// </summary>/// <param name="byteBlock"></param>void Build(ByteBlock byteBlock);
}
实现完大概这样。
class MyRequestPackage : MyBase, IRequestInfoBuilder, IFixedHeaderRequestInfo
{...public int MaxLength => 1024 * 1024;//构建数据时,指示内存池的申请长度。也就是单个包可能达到的最大长度。避免内存池扩容带来消耗public int PackageLen{get{int len = 0;len += 2;//headlen += 4;//PackageLenlen += 2;//commandlenlen += Command == null ? 0 : Command.Length; //Commandlen += 2;//data lenlen += this.Data == null ? 0 : this.Data.Length;//Datareturn len;}}public void Build(ByteBlock byteBlock){byteBlock.Write(Encoding.ASCII.GetBytes(this.Header));byteBlock.Write(this.PackageLen, bigEndian: true);byteBlock.Write(this.CommandLen, bigEndian: true);byteBlock.Write(this.Command);byteBlock.Write(this.DataLen, bigEndian: true);byteBlock.Write(this.Data);}
}
然后此时,我们只需要在MyClientAdapter里面设置支持对象发送即可。
/// <summary>
/// 此适配器仅用于客户端。主要功能是包装发送的<see cref="MyRequestPackage"/>。解析收到的<see cref="MyResponsePackage"/>
/// </summary>
internal class MyClientAdapter : CustomFixedHeaderDataHandlingAdapter<MyResponsePackage>
{...//因为MyRequestPackage已经实现IRequestInfoBuilder接口,所以可以使用True。public override bool CanSendRequestInfo => true;
}
此后,我们只需要发送MyRequestPackage对象,然后适配器内部会自动调用Build函数,然后执行发送。
同理,对于服务也需要这样做。
class MyResponsePackage : MyBase, IFixedHeaderRequestInfo, IRequestInfoBuilder
{...public int PackageLen{get{int len = 0;len += 2;//headlen += 4;//PackageLenlen += 2;//commandlenlen += Command == null ? 0 : Command.Length; //Commandlen += 1;//codelen += 2;//data lenlen += this.Data == null ? 0 : this.Data.Length;//Datareturn len;}}public int MaxLength => 1024 * 1024;//构建数据时,指示内存池的申请长度。也就是单个包可能达到的最大长度。避免内存池扩容带来消耗public void Build(ByteBlock byteBlock){byteBlock.Write(Encoding.ASCII.GetBytes(this.Header));byteBlock.Write(this.PackageLen, bigEndian: true);byteBlock.Write(this.CommandLen, bigEndian: true);byteBlock.Write(this.Command);byteBlock.Write(this.Code);byteBlock.Write(this.DataLen, bigEndian: true);byteBlock.Write(this.Data);}
}
/// <summary>
/// 此适配器仅用于服务器。主要功能是包装发送的<see cref="MyResponsePackage"/>。解析收到的<see cref="MyRequestPackage"/>
/// </summary>
internal class MyServerAdapter : CustomFixedHeaderDataHandlingAdapter<MyRequestPackage>
{...//因为MyRequestPackage已经实现IRequestInfoBuilder接口,所以可以使用True。public override bool CanSendRequestInfo => true;
}
至此,基本的工作就完全完成了。
三、创建服务器和客户端
3.1 服务器
服务器应该使用MyServerAdapter适配器。其他配置可以看TcpService
var service = new TcpService();
service.Received = async (client, e) =>
{if (e.RequestInfo is MyRequestPackage requestPackage){await Console.Out.WriteLineAsync("已收到MyRequestPackage");//构建响应var response=new MyResponsePackage();response.SetCode(200);response.SetCommand(new byte[] {0,1,2 });response.SetData(new byte[] {3,4,5 });await client.SendAsync(response);}
};service.Setup(new TouchSocketConfig()//载入配置.SetListenIPHosts("tcp://127.0.0.1:7789", 7790)//同时监听两个地址.SetTcpDataHandlingAdapter(() => new MyServerAdapter()).ConfigureContainer(a =>//容器的配置顺序应该在最前面{a.AddConsoleLogger();//添加一个控制台日志注入(注意:在maui中控制台日志不可用)}).ConfigurePlugins(a =>{//a.Add();//此处可以添加插件}));service.Start();//启动
3.2 客户端
客户端应该使用MyClientAdapter适配器。其他配置可以看TcpClient
var tcpClient = new TcpClient();
tcpClient.Received =async (client, e) =>
{//从服务器收到信息。但是一般byteBlock和requestInfo会根据适配器呈现不同的值。if (e.RequestInfo is MyResponsePackage responsePackage){await Console.Out.WriteLineAsync("已收到MyResponsePackage");}
};//载入配置
tcpClient.Setup(new TouchSocketConfig().SetRemoteIPHost("127.0.0.1:7789").SetTcpDataHandlingAdapter(()=>new MyClientAdapter()).ConfigureContainer(a =>{a.AddConsoleLogger();//添加一个日志注入})) ;tcpClient.Connect();//调用连接,当连接不成功时,会抛出异常。tcpClient.Logger.Info("客户端成功连接");
3.3 客户端发送
在发送时,我们可以直接发送一个MyRequestPackage的对象,因为适配器里面已经定义了如何Build。
var client = GetTcpClient();var request = new MyRequestPackage();
request.SetCommand(new byte[] {0,1,2 });
request.SetData(new byte[] {3,4,5 });
client.Send(request);
3.4 客户端接收
客户端在接收时,适配器会做好解析,然后直接投递MyResponsePackage对象。
var tcpClient = new TcpClient();
tcpClient.Received =async (client, e) =>
{//从服务器收到信息。但是一般byteBlock和requestInfo会根据适配器呈现不同的值。if (e.RequestInfo is MyResponsePackage responsePackage){await Console.Out.WriteLineAsync("已收到MyResponsePackage");}
};
3.5 服务器接收与发送
同理,服务器接收时,适配器会解析投递MyRequestPackage,发送时直接发送MyResponsePackage即可。
var service = new TcpService();
service.Received = async (client, e) =>
{if (e.RequestInfo is MyRequestPackage requestPackage){await Console.Out.WriteLineAsync("已收到MyRequestPackage");//构建响应var response=new MyResponsePackage();response.SetCode(200);response.SetCommand(new byte[] {0,1,2 });response.SetData(new byte[] {3,4,5 });await client.SendAsync(response);}
};
四、关于同步Send
同步Send,就是发送一个数据,然后等待响应,详情可以看Tcp同步请求
但是此处有个小问题,就是waitClient.SendThenReturn函数并没有发送对象的实现。那么我们就需要手动Build数据。
同时只能用SendThenResponse,而不是SendThenReturn 。
var client = GetTcpClient();var request = new MyRequestPackage();
request.SetCommand(new byte[] { 0, 1, 2 });
request.SetData(new byte[] { 3, 4, 5 });
client.Send(request);var waitingClient = client.CreateWaitingClient(new WaitingOptions());
var responsedData = waitingClient.SendThenResponse(request.BuildAsBytes());
if (responsedData.RequestInfo is MyResponsePackage responsePackage)
{//to do
}
结束,看起来很麻烦的协议,实际上也可以很优雅的解决。
最后,完整代码我上传到 csdn资源。没别的意思,就是我的积分也没有了。得赚点积分。
如果大家下载困难,不妨把文中代码复制一下也可以,因为全部代码也在这里。